Configure Raspberry Pi & OpenMediaVault
This phase focuses on System preparation. You’ll identify your Raspberry Pi on the network, connect to it using SSH, and perform critical system updates and upgrades.
These steps ensure your Raspberry Pi is secure, updated, and ready
for installing services like OpenMediaVault and other tools.
👇👇👇👇👇
PHASE_2_START
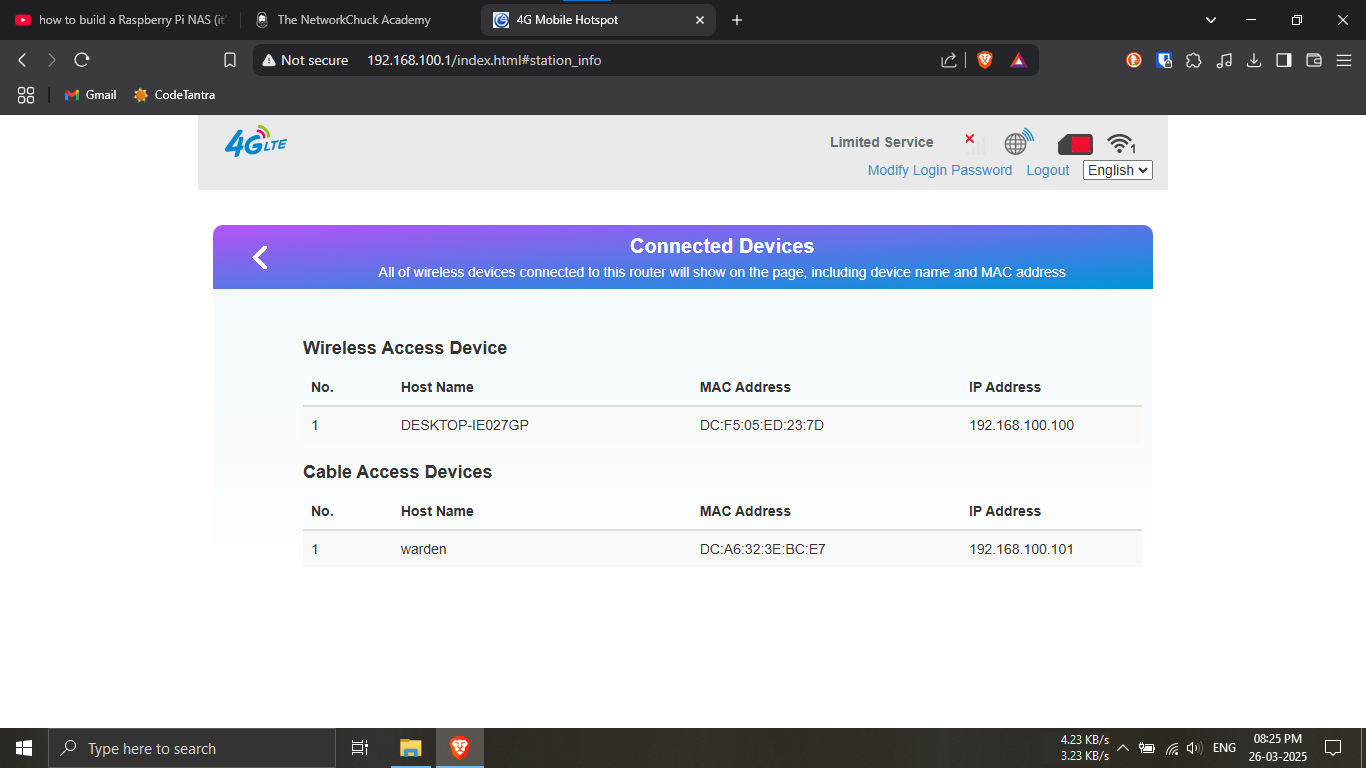
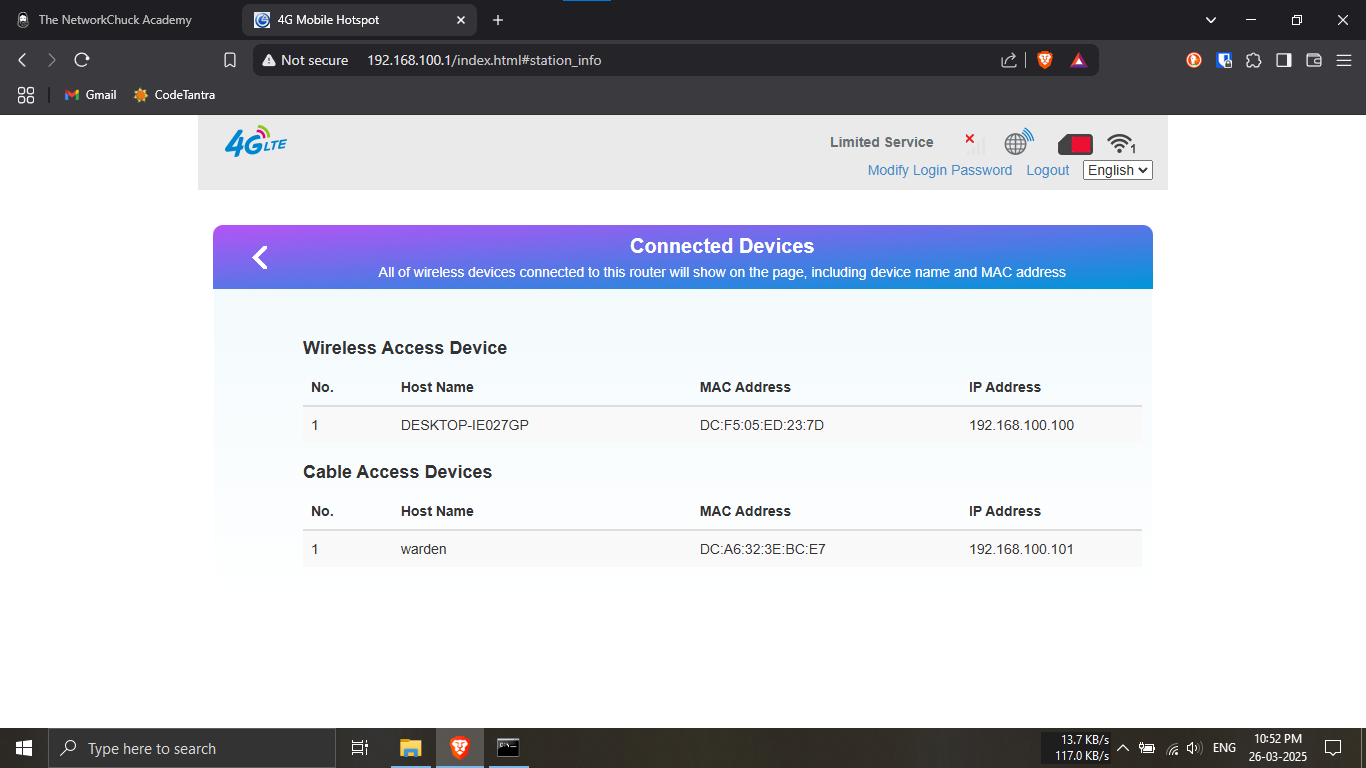
Step 10: Know your Raspberry Pi’s IP address via your
router’s admin page.
🔹Breakdown:
-----Log in to your router’s admin page from a browser
(usually 192.168.1.1 or
192.168.0.1).
-----Look for a list of connected devices.
-----Find the entry matching your Pi’s hostname (e.g.,
werden) or MAC address.
💡 You need this IP to connect via SSH or web interfaces!
🌐🔍
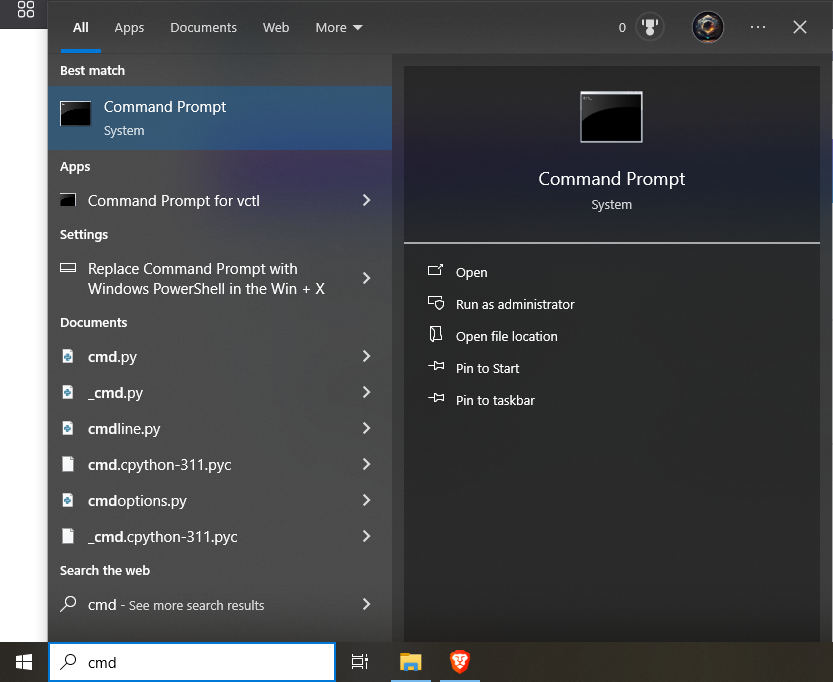
Step 11: Open the Command Prompt on your computer.
🔹Breakdown:
-----Click the Start menu (Windows icon in
bottom-left corner).
-----Type cmd in the search bar.
-----Press Enter or click on
Command Prompt from the results.
💡 You’ll use CMD to SSH into your Raspberry Pi and perform
remote configurations! 💻🖱️
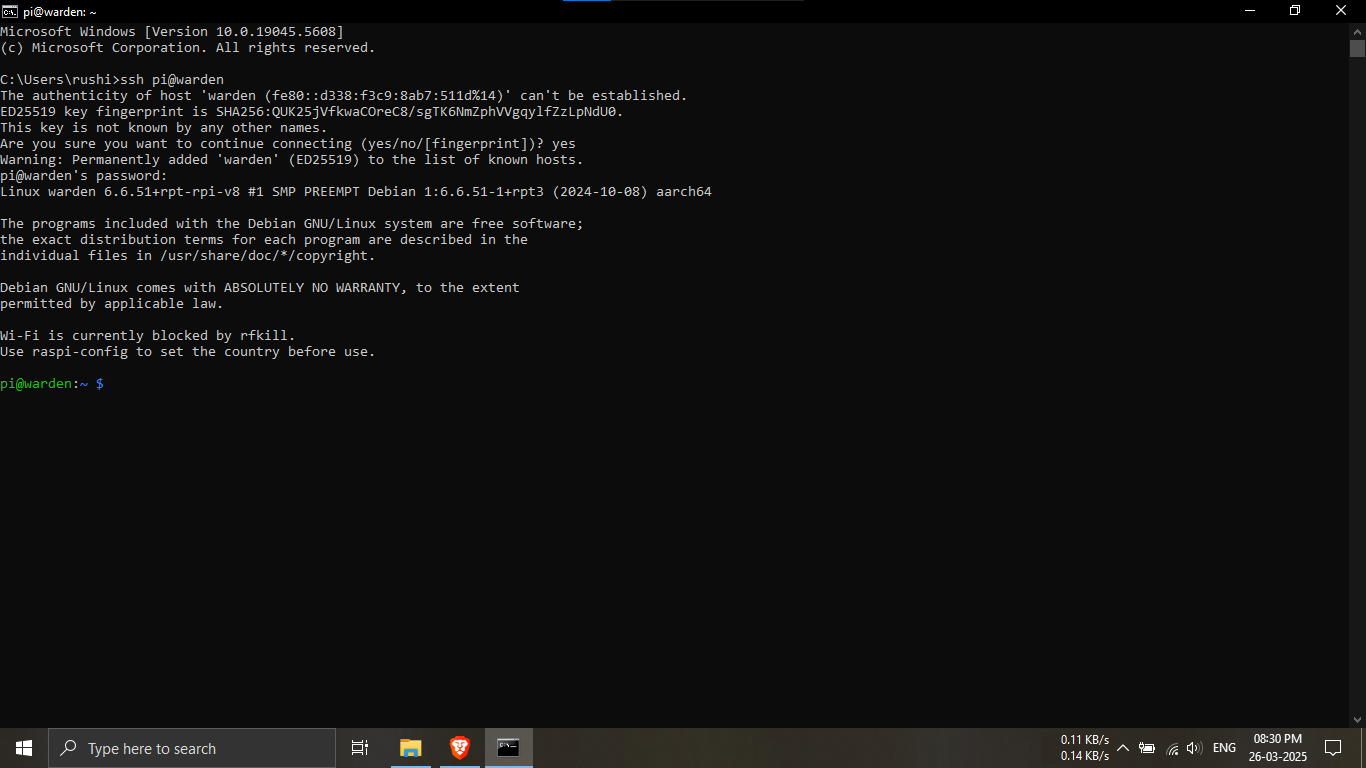
Step 12: SSH into your Raspberry Pi using Command
Prompt.
🔹Breakdown:
-----In the Command Prompt window, enter the following
command:
ssh <username>@<ip_address_of_RPI>
-----Alternatively, if you set a local hostname during
setup:
ssh <username>@<localname>
-----When prompted, enter the password you configured
earlier (e.g., root).
💡 Example: ssh pi@192.168.100.101 or
ssh pi@warden 🧠🔐
🛑 If you get a prompt asking to trust the key, type
yes and press Enter.

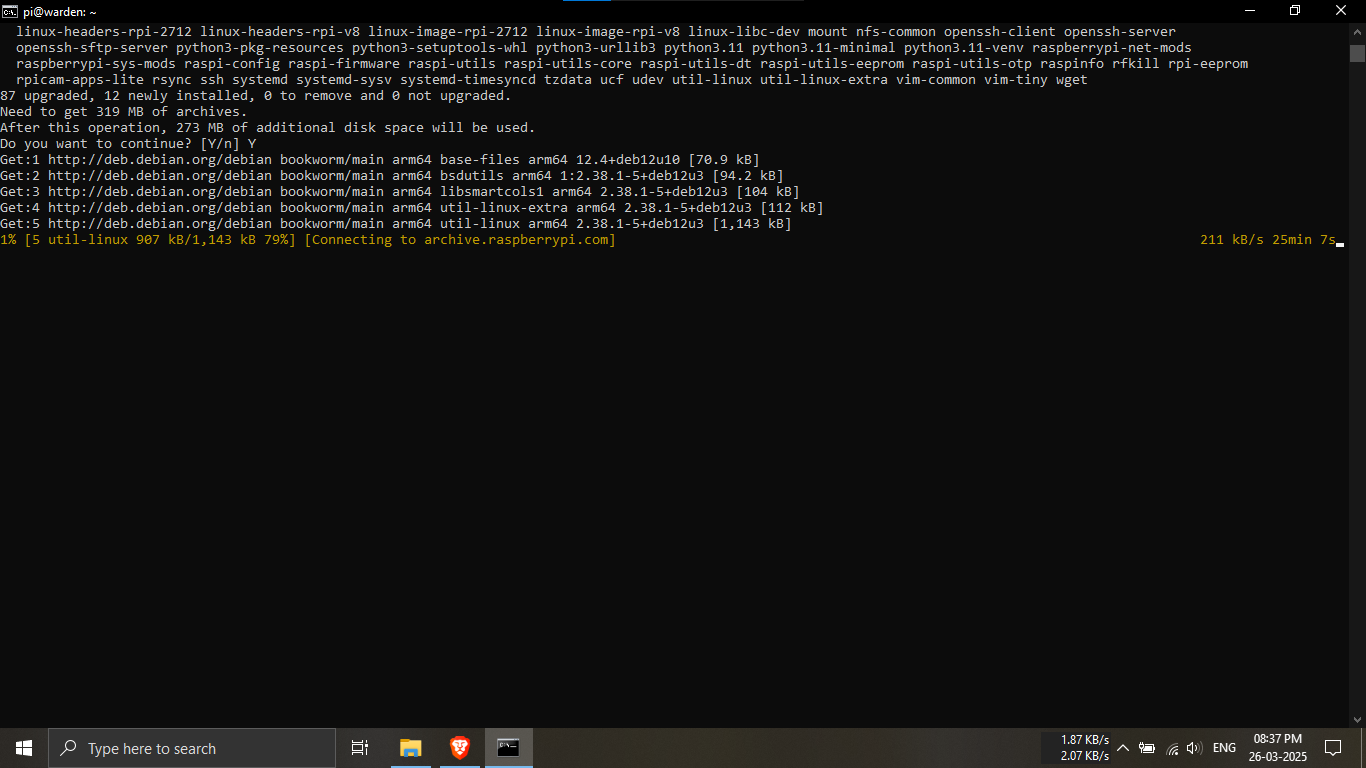
Step 13.1: Update and upgrade your Raspberry Pi system
packages.
🔹Breakdown:
-----After successfully logging in via SSH, you'll want
to ensure your Pi is up-to-date.
-----Use the following command to update the package
list and upgrade installed packages.
sudo apt update && sudo apt upgrade
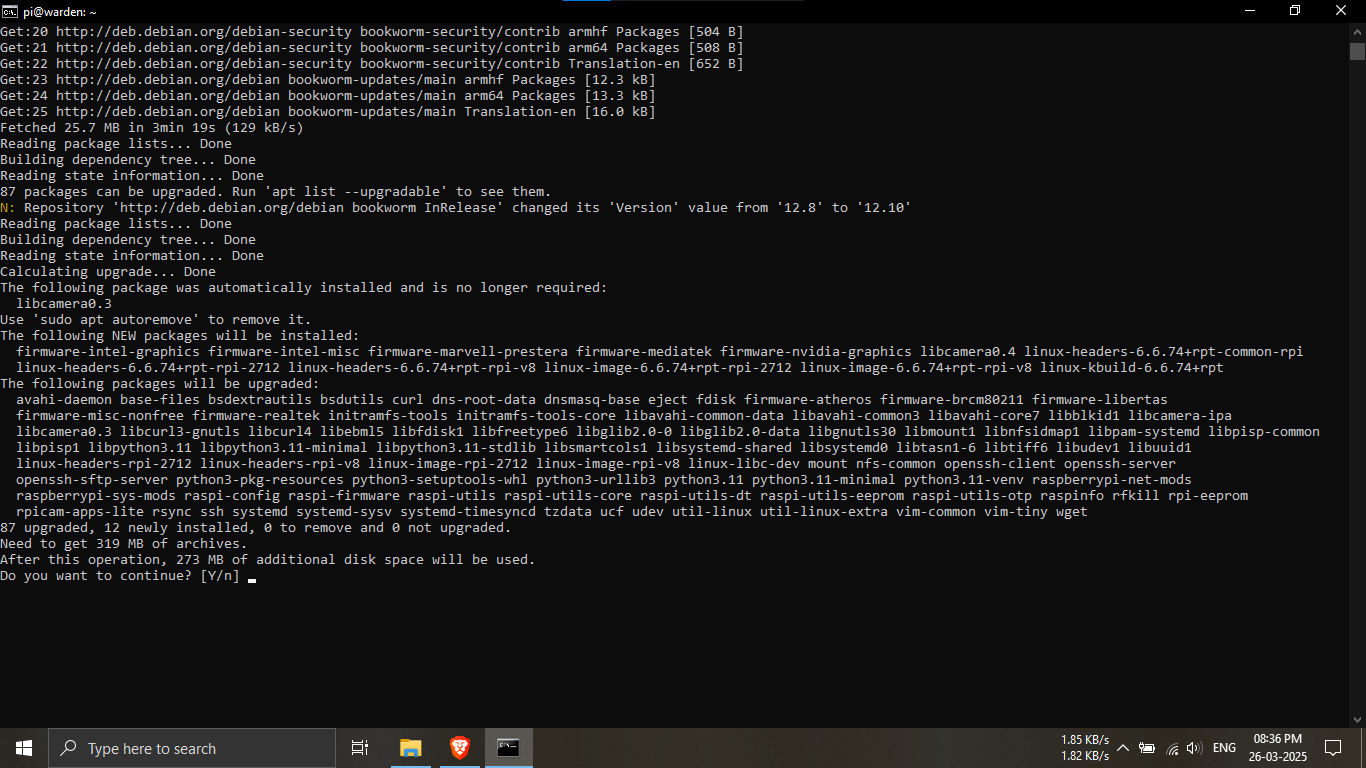
Step 13.2: Type "Y"
💡 Tip: You might be asked to confirm during upgrade —
type Y and hit Enter! 🛠️🔐
Instruction 13.2
Step 13.3: Sit back and let your Raspberry Pi complete
the update and upgrade process.
🔹Breakdown:
-----The update and upgrade commands can take several
minutes to finish.
-----Your Pi is downloading and installing package
updates.
💡 This is the perfect time to stretch, relax, or grab a
cup of coffee. ☕🍪
🚀 Don’t close the terminal — just wait until the
process completes.
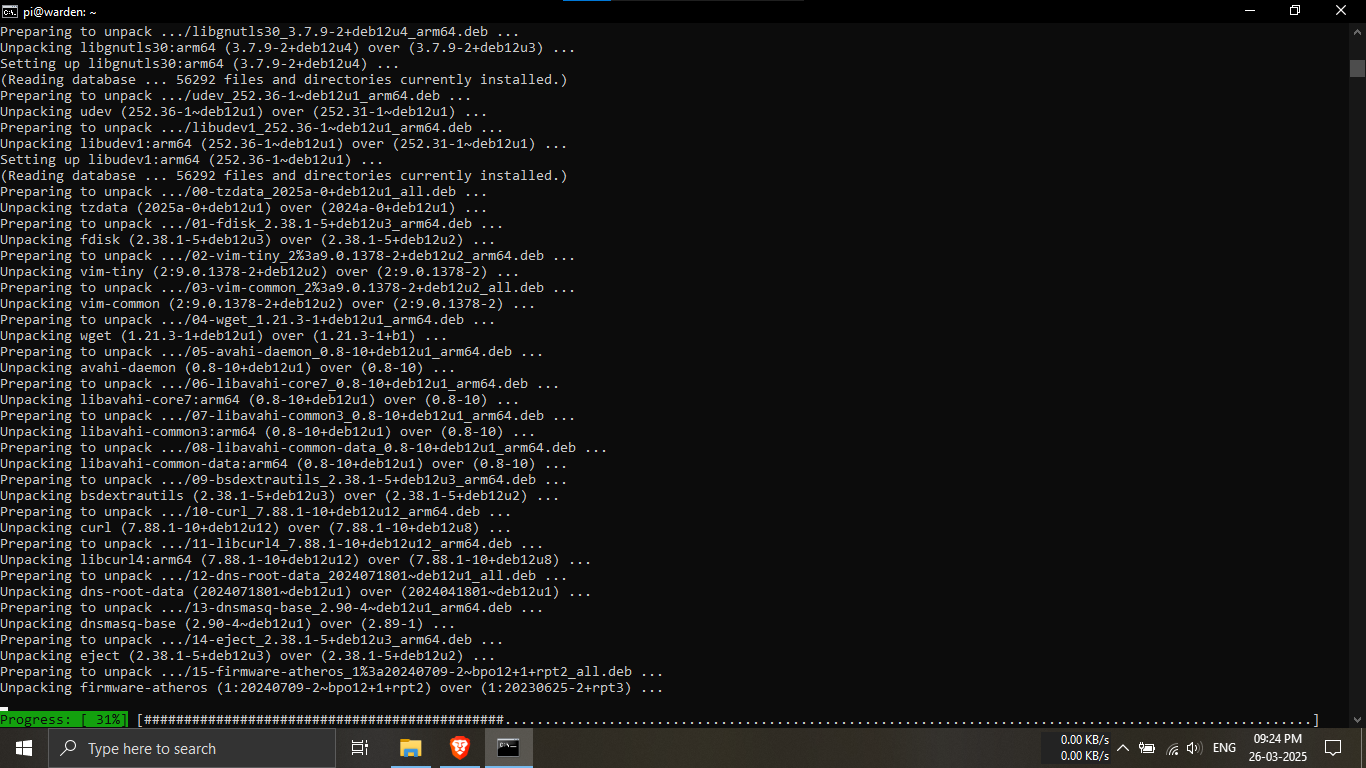
Step 13.4: Monitor the green progress bar during the
upgrade process.
🔹Breakdown:
-----As the packages are being upgraded, you’ll see a
green #### progress bar in the terminal.
-----This indicates how far along the system is in
processing updates.
-----Each section of the bar represents a completed step
in the installation.
💡 If the bar freezes momentarily, don’t worry — some
packages take longer. 🟩⏳
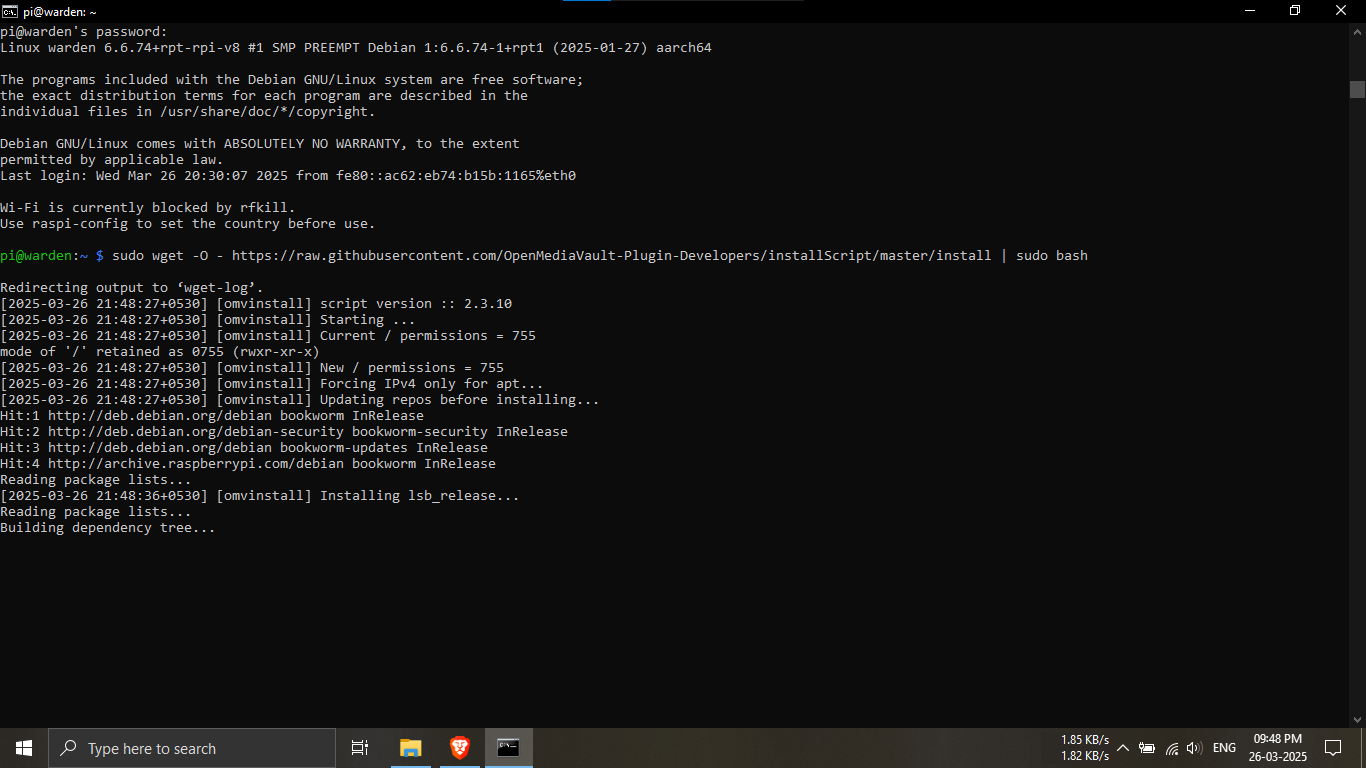
Step 14.1: Copy and paste the command below to install
OpenMediaVault (OMV).
🔹Breakdown:
-----This script will download and install OMV
automatically on your Raspberry Pi.
-----Make sure you are still logged in to the Pi via SSH
before running this command.
💡 This step will take some time — let the script finish
completely! ⚙️📦
sudo wget -O - https://raw.githubusercontent.com/OpenMediaVault-Plugin-Developers/installScript/master/install | sudo bash
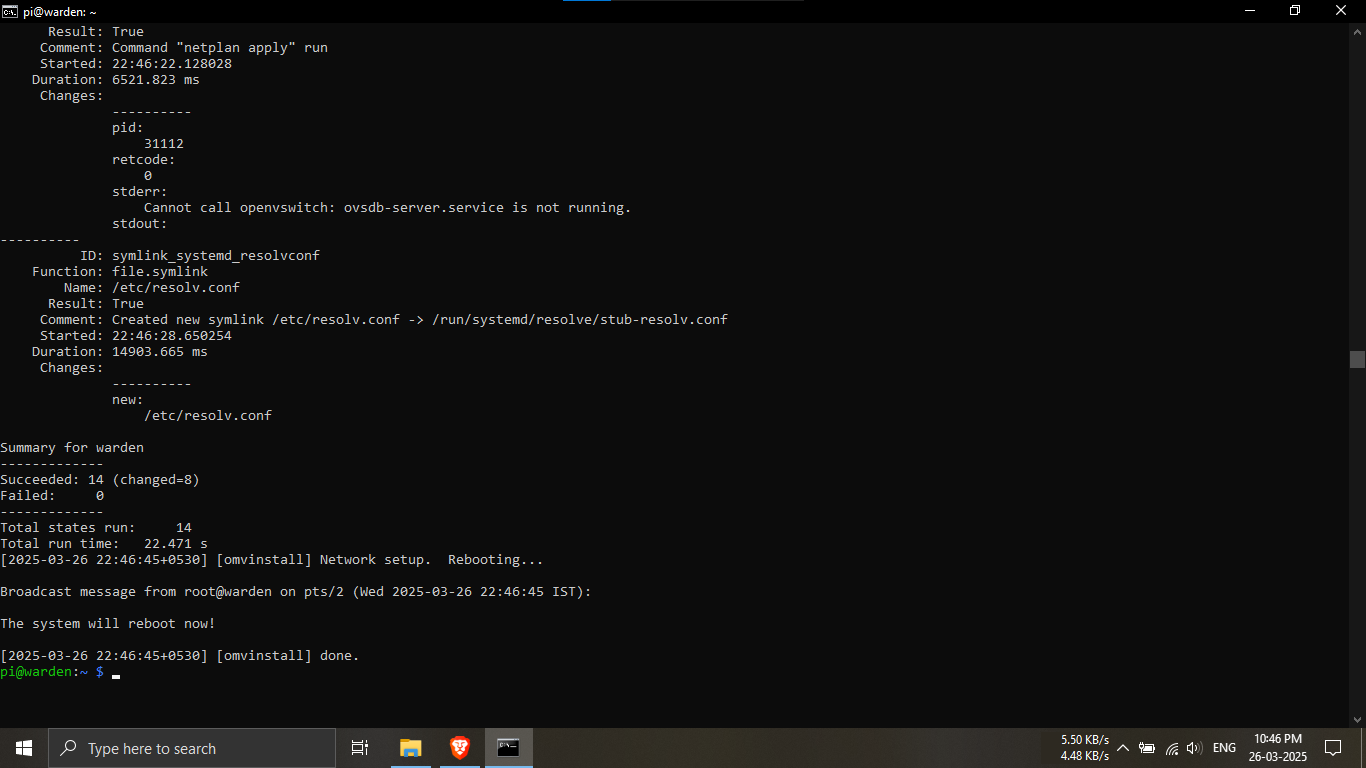
Step 14.2: Confirm OpenMediaVault was installed
successfully.
🔹Breakdown:
-----After running the install script, the terminal will
display a series of setup and configuration messages.
-----If the installation is successful, you'll see final
lines like:
<<< Installation complete >>>
or The system will reboot now !
-----The prompt will return to
pi@warden:~$ after setup finishes.
💡 If you see these messages, OMV is ready to use! ✅🌐
Step 15.1: Verify the IP address of your Raspberry Pi
again.
🔹Breakdown:
-----After installing OpenMediaVault, the Raspberry Pi
may have rebooted.
-----This could result in a new IP address being
assigned by your router.
-----Repeat Step 10 by visiting your
router's admin page and checking the connected devices
list.
💡 Tip: Look for your Pi’s hostname or MAC address to
confirm it’s the same device. 🧠🔍
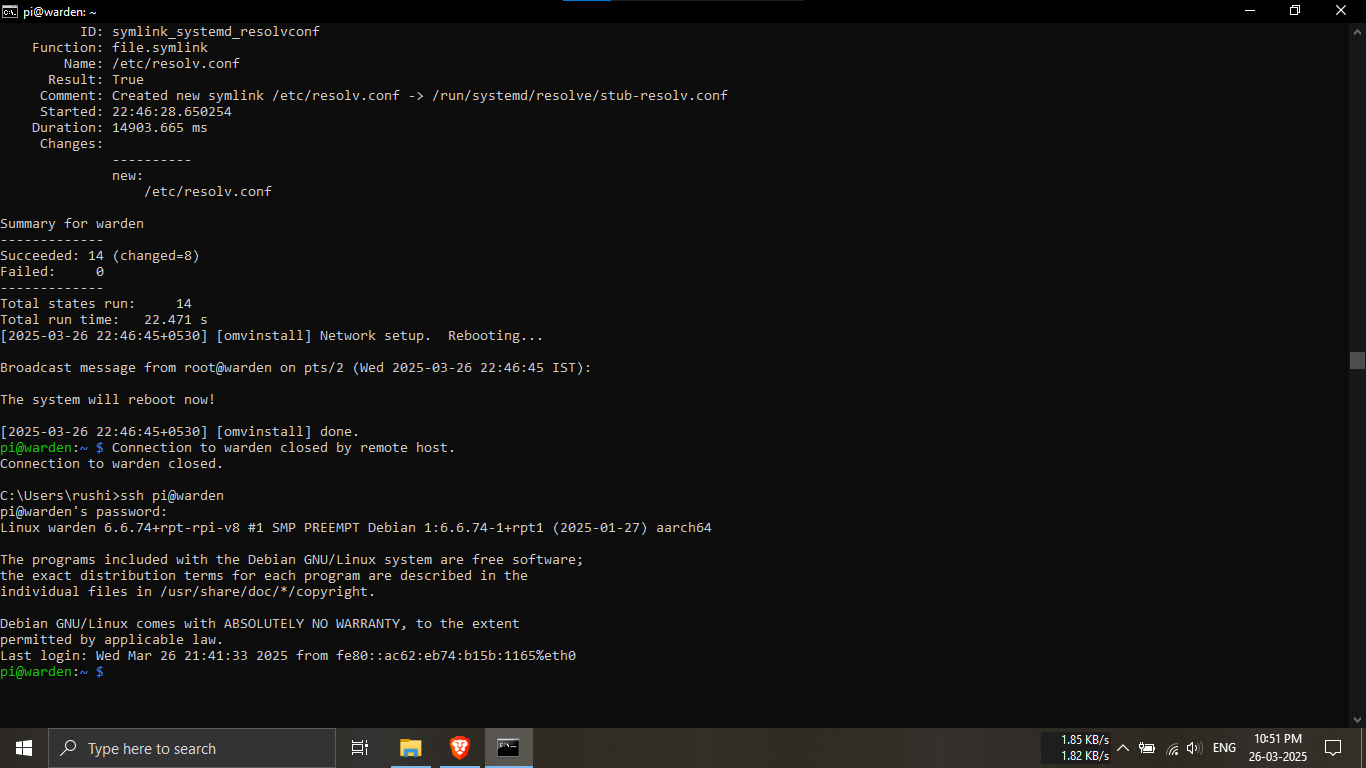
Step 15.2: SSH back into your Raspberry Pi using the new
or confirmed IP address.
🔹Breakdown:
-----After verifying the Pi’s current IP (see Step
15.1), open your Command Prompt.
-----Use the same SSH login command you used in
Step 12:
ssh <username>@<new_ip_address>
or ssh <username>@<hostname>
-----Enter your password when prompted (e.g.,
root).
💡 Example: ssh pi@192.168.100.101 or
ssh pi@warden 🔁🔐

Step 15.3: Open your browser and enter the confirmed
Raspberry Pi IP address to access OpenMediaVault.
🔹Breakdown:
-----Launch any web browser (e.g., Chrome, Firefox,
Edge).
-----In the address bar, type the IP address you found
in Step 15.1.
-----Press Enter to load the
OpenMediaVault web interface.
💡 Example: 192.168.100.101🌐💡
⚠️ Make sure you're on the same network as your
Raspberry Pi.

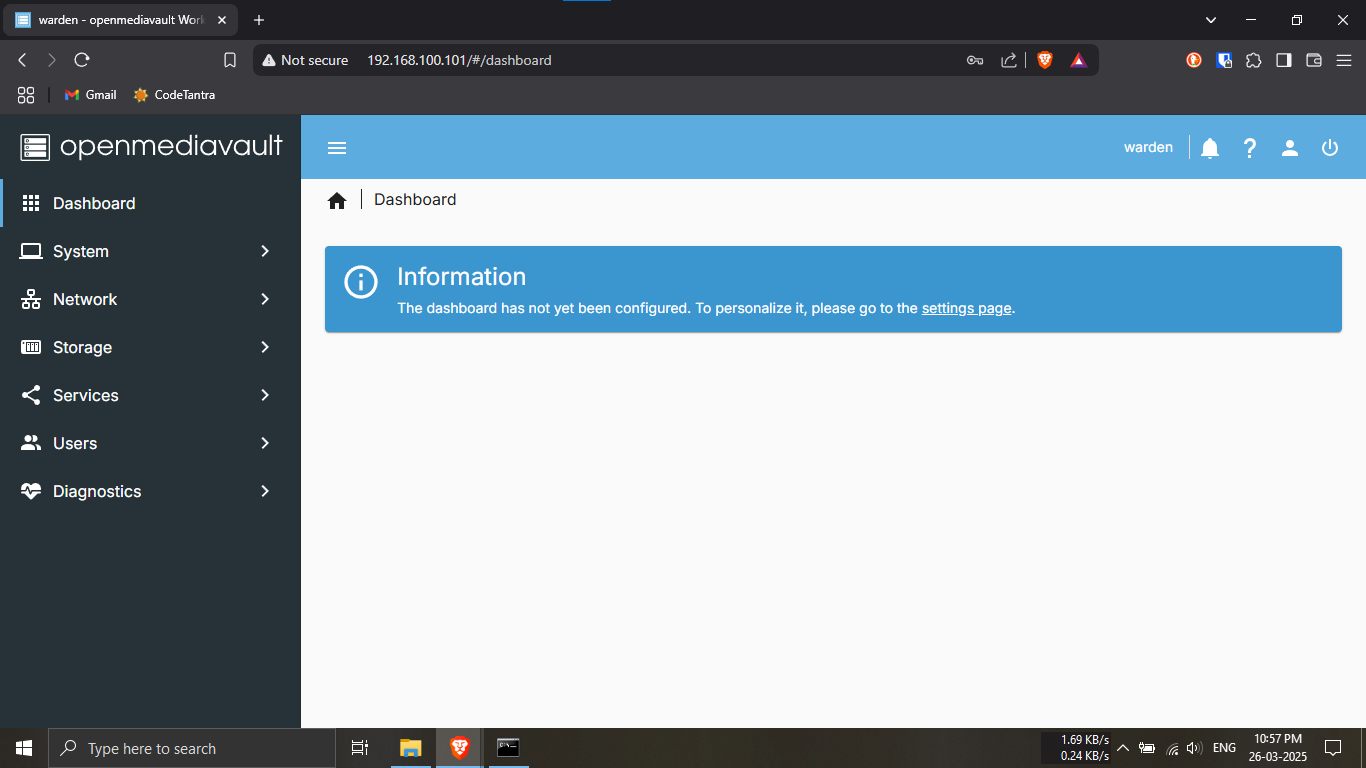
Step 15.4: You should now see the OpenMediaVault (OMV)
web interface in your browser.
🔹Breakdown:
-----The interface will show a login screen with the OMV
logo.
-----You’ll be prompted to enter a username and password
(default credentials if not changed).
-----The layout includes a sidebar menu with options
like System, Storage,
Services, and more.
💡 If you see the OMV dashboard, installation was
successful! 🎉🖥️
⚠️ If nothing loads, double-check the IP and that your
Pi is powered on and connected.

Step 15.5: Enter the default login credentials to access
OpenMediaVault.
🔹Breakdown:
-----On the OMV login screen, use the following
credentials:
Username: admin
Password: openmediavault
-----These are the default credentials set by
OpenMediaVault for the web interface.
-----You’ll be able to change the password after logging
in.
💡 If login fails, make sure there are no typos or try
reloading the page. 🔐🧑💻
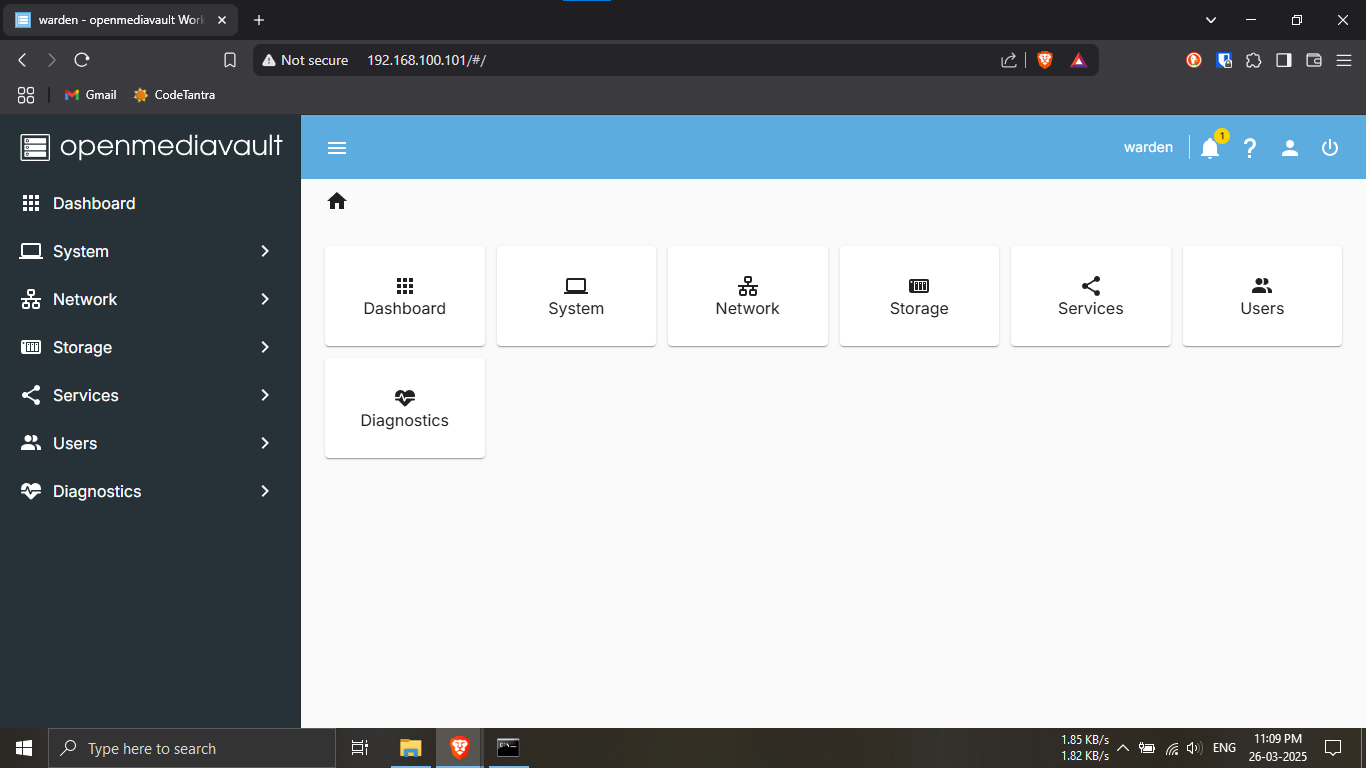
Step 15.6: You've successfully logged in and can now see
the OpenMediaVault (OMV) dashboard.
🔹Breakdown:
-----After entering the correct credentials, you’ll be
directed to the OMV main interface.
-----This includes a sidebar menu with sections like
System, Storage,
Access Rights Management, and more.
-----You’ll also see system information like CPU usage,
memory usage, and uptime.
💡 You now have full access to manage storage, users,
and services — welcome to your new NAS! 📊🗂️🚀
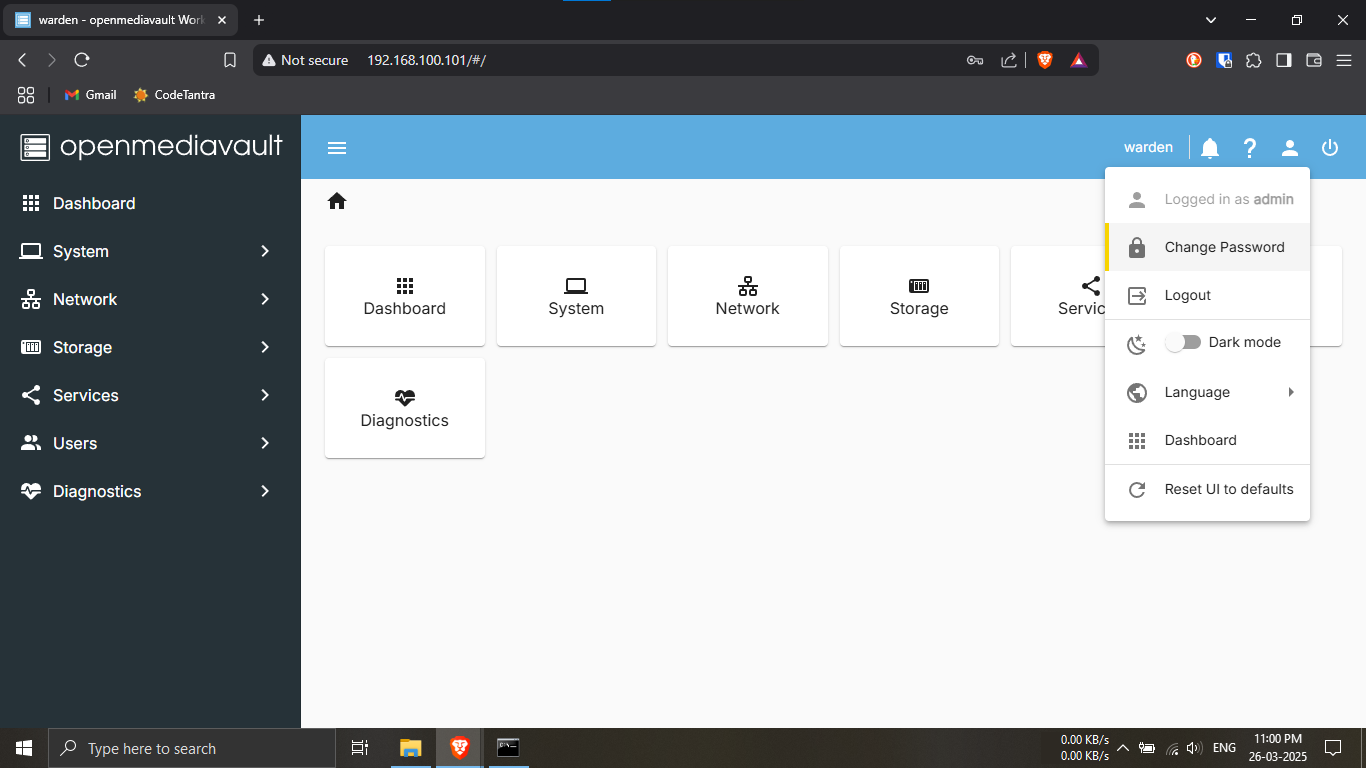
🔐 Step 16.1: Change the Default OMV Web Password
🔹 Breakdown:
- After logging in to the OMV dashboard, locate the
top-right corner profile icon (👤).
- Click it to open the dropdown menu.
- Select Change Password.
💡 Tip: Choose a strong password to protect your NAS
system. Keep it saved securely! 🔒
Eg: raspberry (It is just
used for demonstration purpose.)

✅ Step 16.2: Password Changed Successfully
🔹 Breakdown:
- Once the password change is confirmed, you’ll be
redirected or see a success message.
- You can now log in with your new password in future
sessions.
- The change is applied immediately — no reboot required.
💡 Next Step: With admin access secured, you can
begin setting up storage, users, and services in OMV! 🚀
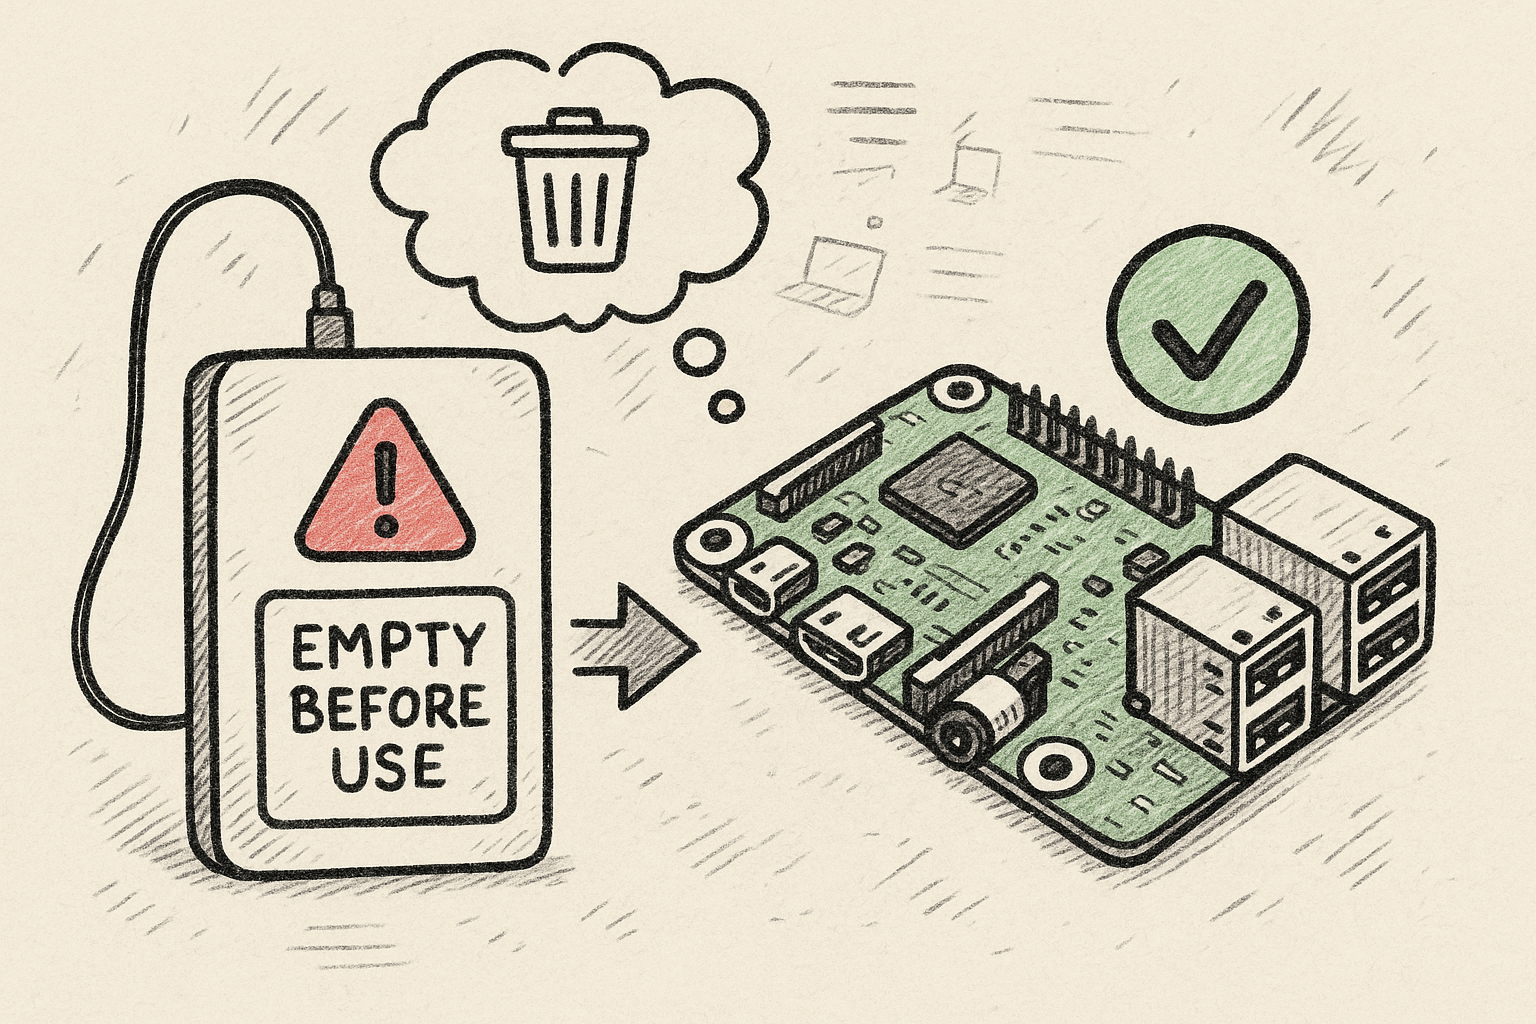
Step 17.1: ⚠️ Backup your external drive before plugging
it in.
🔹Breakdown:
-----Before connecting your external storage (e.g., 1TB
hard disk), make sure to back up all existing files.
-----The drive must be formatted and completely empty
for OMV to use it properly.
-----Plugging in a used drive without formatting will
result in data loss.
-----Plug in the disk now before proceeding further.
💡 Always copy important data to another device before
proceeding — formatting will erase everything! 🛡️🧯
Step 17.2: You should now see the OpenMediaVault
dashboard again.
🔹Breakdown:
-----After logging in and changing the password, the OMV
dashboard is visible once more.
-----Now that your external USB drive is connected, we
will begin configuring it through OMV.
-----You’ll prepare the drive so it can be used for
storage and file sharing.
💡 This is where you turn your external disk into a
fully functional NAS storage volume! 💾⚙️
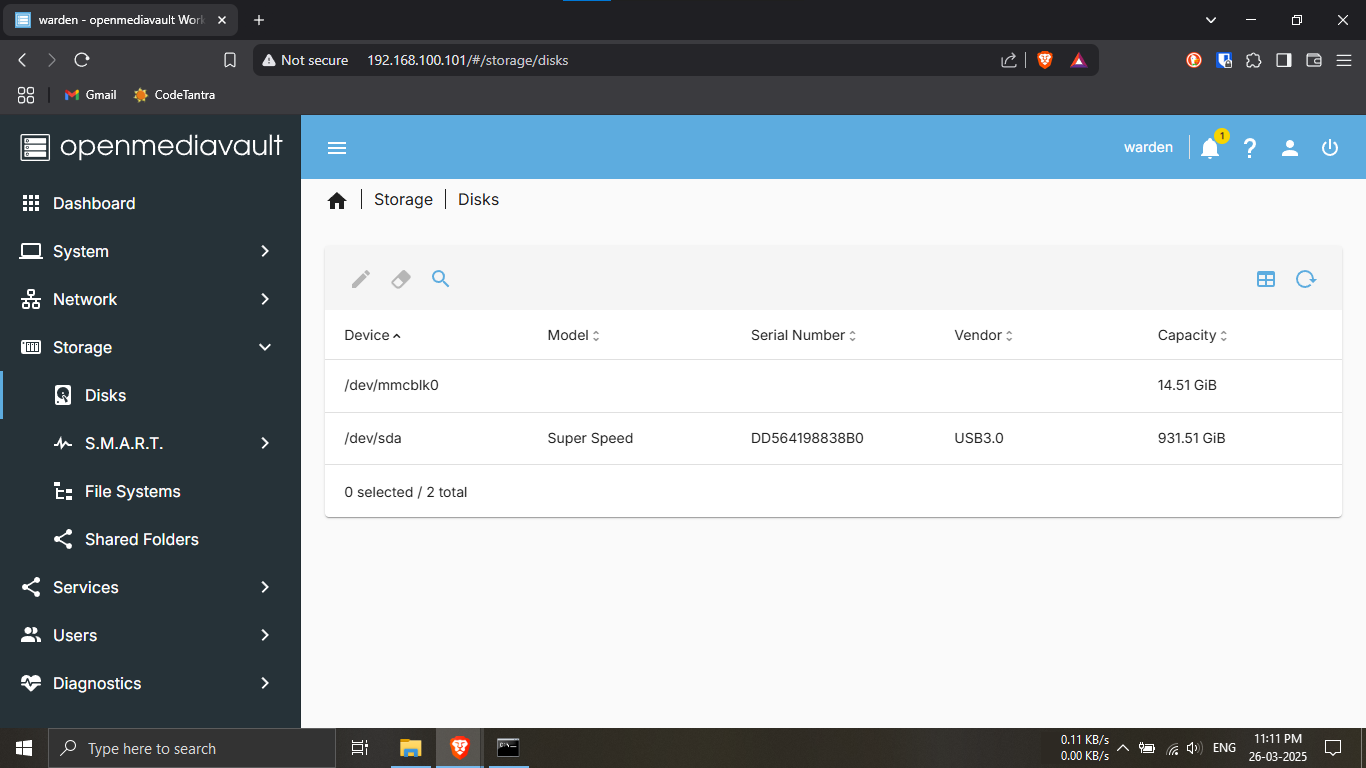
Step 17.3: Check if the USB disk is detected by OMV.
🔹Breakdown:
-----Click on the "Storage" menu in the left
sidebar.
-----Then select the "Disks" tab.
-----You should see your newly connected USB hard drive
listed here.
-----Details such as model, size, and device name (like
/dev/sda) will be shown.
💡 If the disk is not listed, try unplugging and
reconnecting it, or refreshing the page. 🔄🔌

Step 17.4: Navigate to the File Systems section.
🔹Breakdown:
-----In the sidebar under Storage, click on
"File Systems".
-----This page shows the file systems currently mounted
on your OMV system.
-----It should be empty for now, since we haven’t
formatted or mounted the USB drive yet.
💡 This is where you'll mount and manage volumes after
formatting.
For now, just verify it's blank. 📂🧭
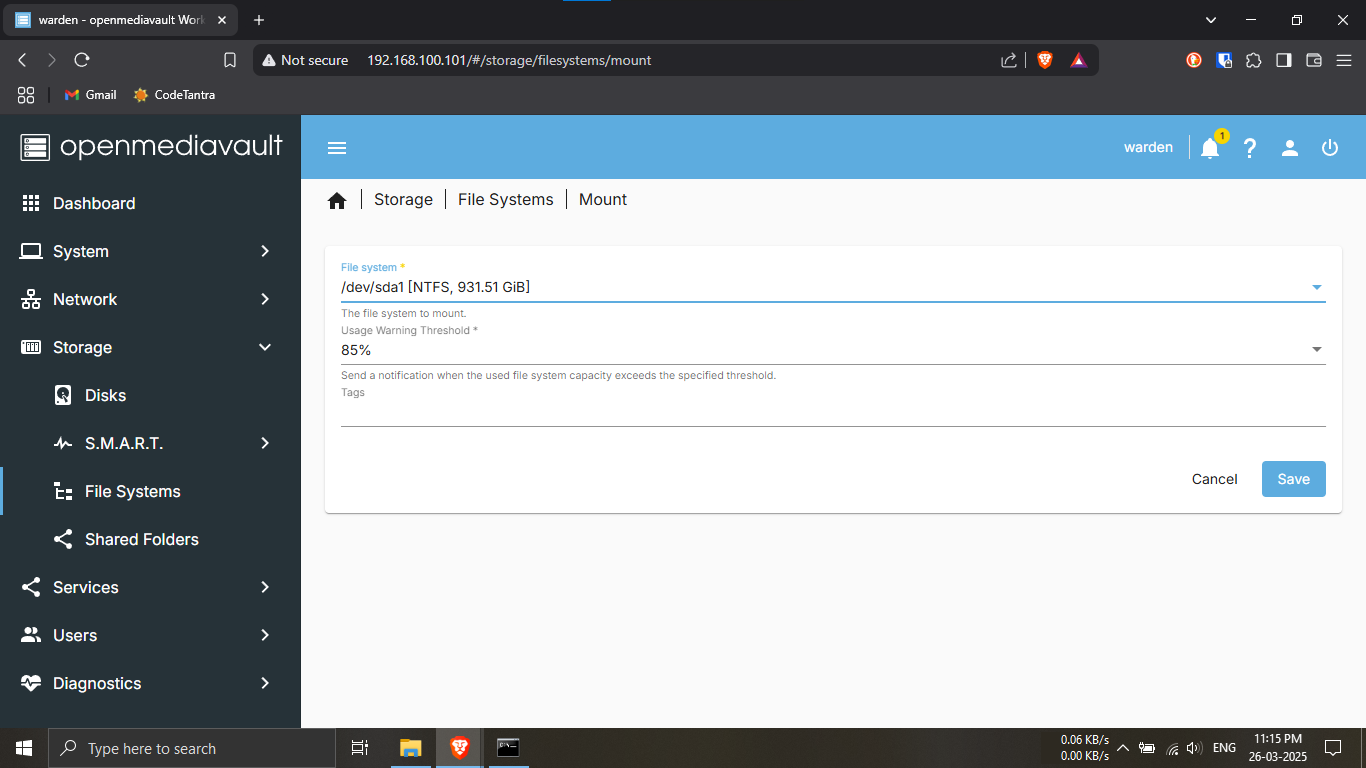
Step 17.5: Open the mount dialog to prepare your disk
for use.
🔹Breakdown:
-----In the File Systems tab, click the
blue triangle icon -----This will open the
"Mount" window.
-----In the "File System" dropdown menu, select
the disk you want to mount (e.g., your USB drive).
-----In the "Usage Warning Threshold" section,
choose a percentage value (e.g., 85%).
-----OMV will notify you if the disk usage exceeds this
threshold.
-----Click "Save"
💡 Setting a usage warning helps prevent surprises when
your storage starts to fill up. 📉🛎️

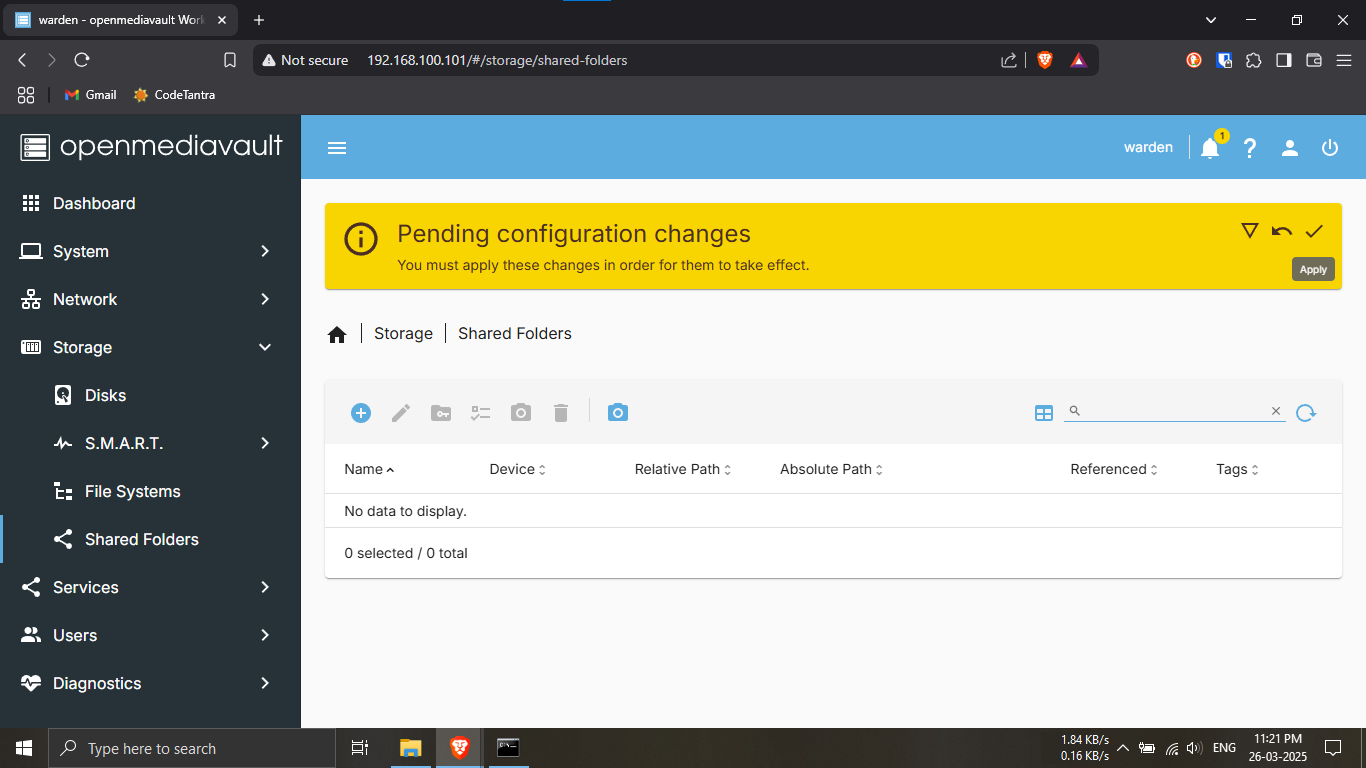
Step 17.6: Check if the “Shared Folders” section is
currently empty.
🔹Breakdown:
-----In the left sidebar, under the
"Storage" section, click on
"Shared Folders".
-----This tab will list any shared folders available in
your OMV system.
-----Since no folders have been created yet, this page
should be empty for now.
💡 Shared folders are where you’ll store and organize
data — we’ll set one up soon! 🗂️📁
Step 17.7: Finalize your changes by clicking the yellow
"Apply" tick at the top.
🔹Breakdown:
-----After mounting the disk and checking shared
folders, a yellow bar should appear at the top of the
OMV web interface.
-----Click the tick/checkmark icon -----OMV will
begin applying the configuration updates made so far.
💡 Always click this yellow tick after changes, or they
won’t take effect! ✅🔧
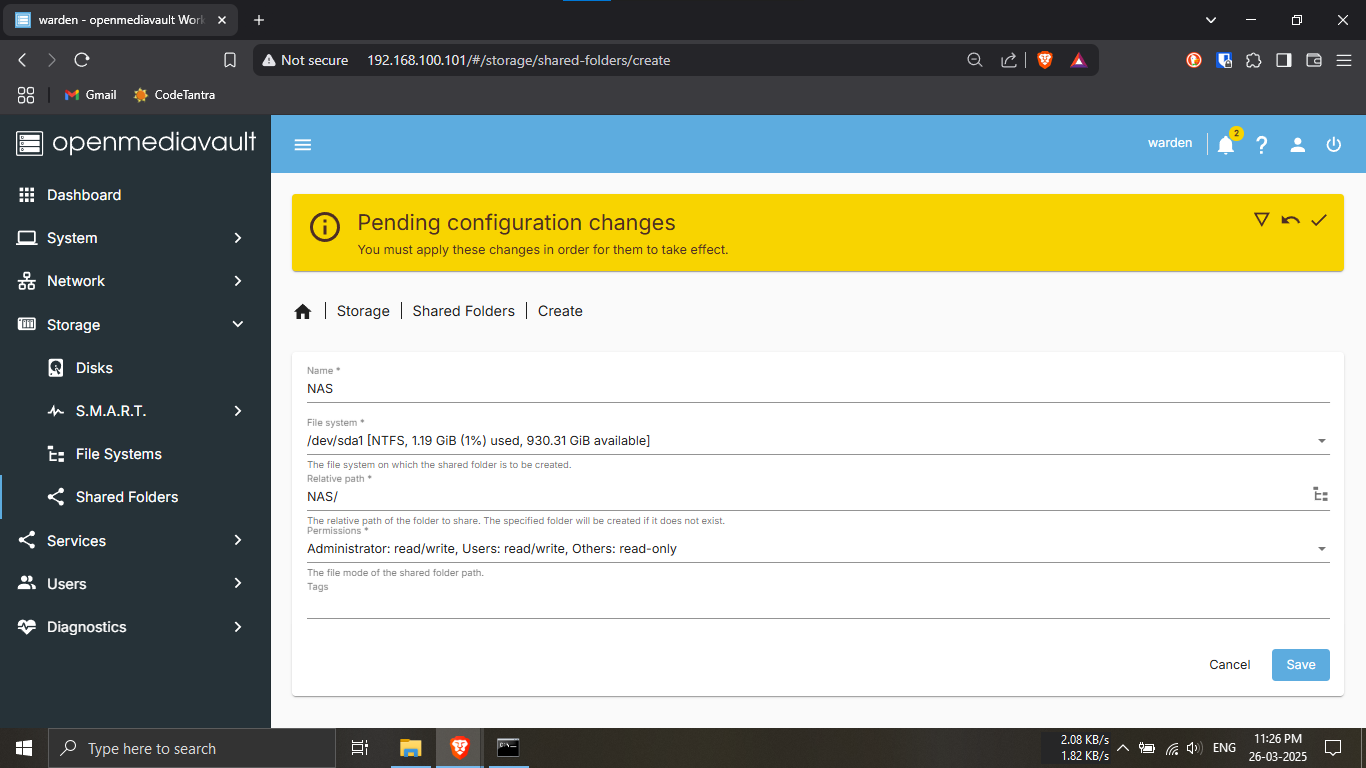
Step 17.8: Create your first shared folder on the
mounted USB disk.
🔹Breakdown:
-----Go to Storage → Shared Folders from the left
sidebar.
-----Click the “+” (Add) button at the top.
-----In the Name field, enter a folder name
(e.g., NAS).
-----In the File System dropdown, select your
mounted USB disk.
-----In the Relative Path field, enter the folder
name again with a forward slash (e.g.,
NAS/).
-----Click Save to confirm.
💡 This folder will store all your files — make sure to
name it clearly! 📂💾
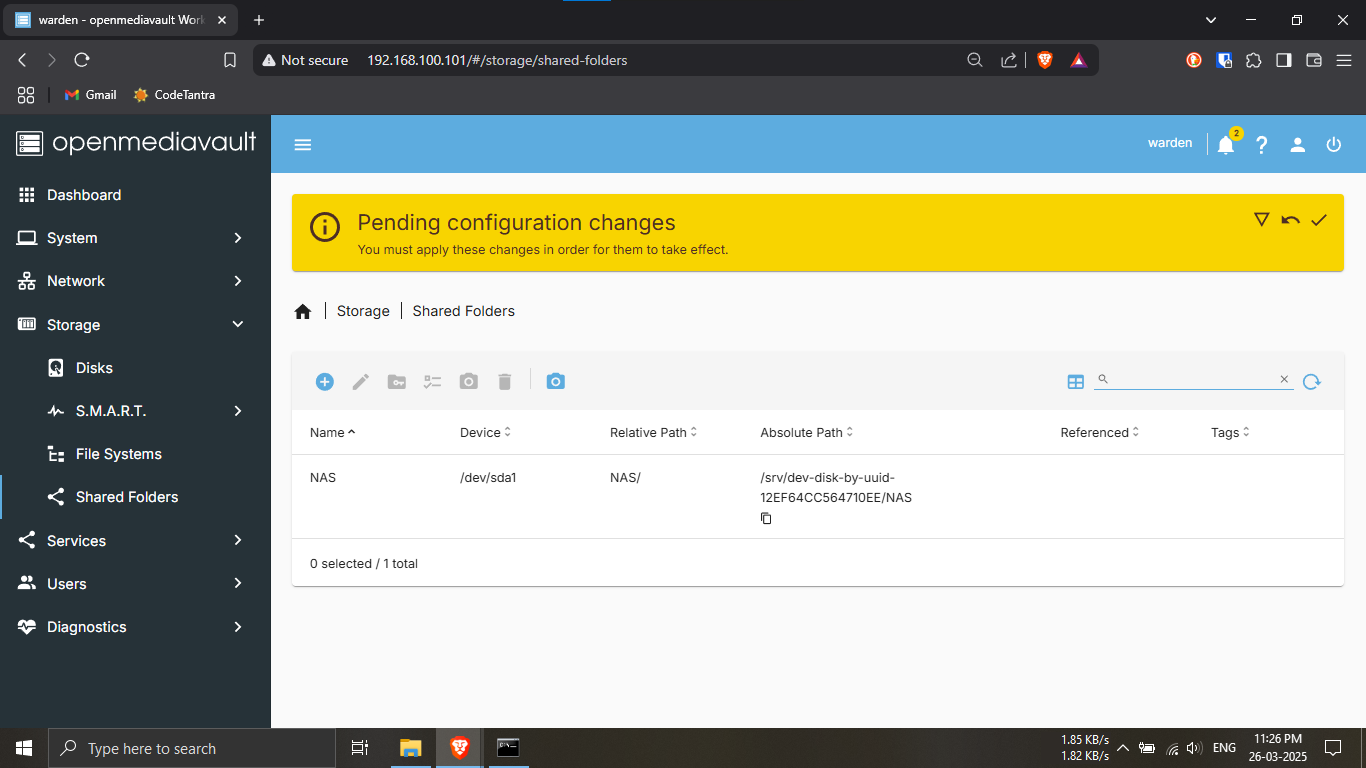
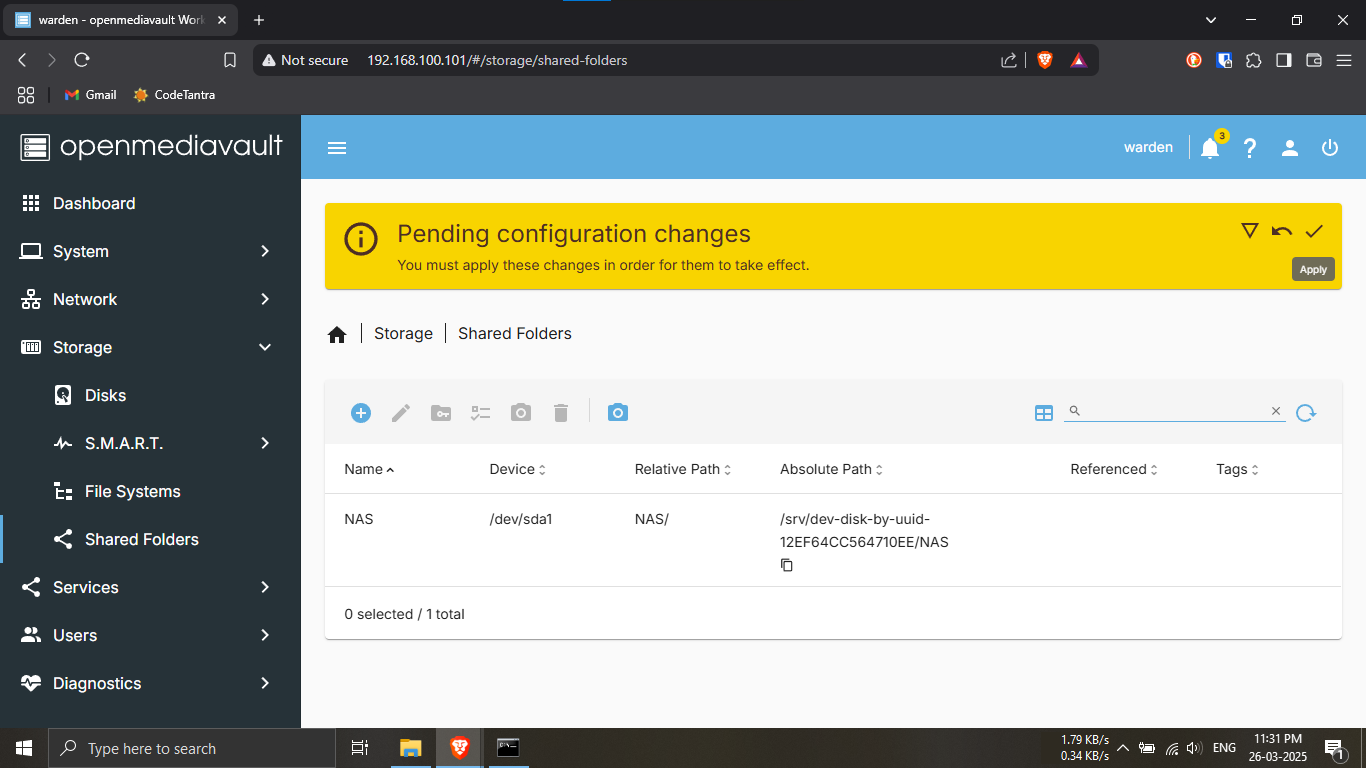
Step 17.9: Confirm that your shared folder appears
correctly in the list.
🔹Breakdown:
-----Once saved, your new shared folder (e.g.,
NAS) should now appear in the
Shared Folders list.
-----It will show details like Name,
Device, Relative Path, and more.
-----Refer to the image provided to verify your folder
looks similar.
💡 Make sure the folder appears exactly as configured.
If not, go back and double-check the name, path, and
selected disk. ✔️🗂️
⚠️ Follow the next steps carefully — this folder will be
used for all your shared network storage!

Step 17.10: Set up permissions for your shared
folder.
🔹Breakdown:
-----In the Shared Folders list, locate the
folder you just created (e.g., NAS).
-----Click on it to select it.
-----Then, click on the blue key icon at the top
— this opens the Permissions menu.
💡 Proper permissions are essential for controlling who
can read or write to your shared folder! 🔐🧑💻
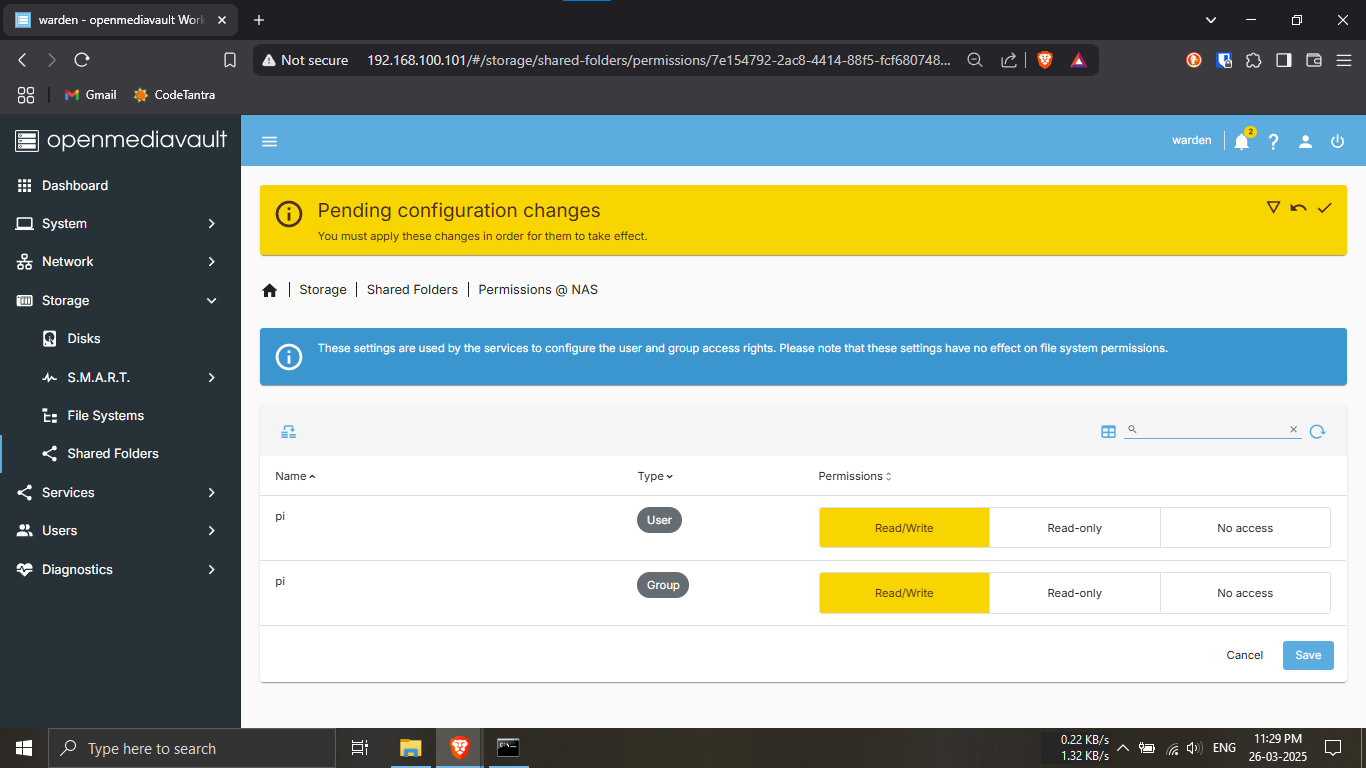
Step 17.11: Assign Read/Write permissions to your shared
folder.
🔹Breakdown:
-----On the Permissions window that appears after
clicking the key icon:
-----Set "Read/Write" access for both the
User and the Group.
-----This allows full access for the selected users or
groups to read and modify files.
-----Click Save to apply the permission
settings.
💡 This ensures authorized users can fully interact with
the NAS storage! ✅📁
Step 17.12: Finalize your permission settings by
applying the changes.
🔹Breakdown:
-----After setting Read/Write permissions, a
yellow bar will appear at the top of the page.
-----Click on the yellow tick icon to apply and
save the pending changes.
💡 Always apply changes after any configuration to
ensure they take effect! 🛠️✔️
Note: The following steps
(18.1 to 18.5) are intended
only for Windows users to configure network file
sharing.
🖥️ Windows Users: Proceed to Step 18.1 to set
up SMB (Samba) / CIFS file sharing.
🍏🐧 macOS / Linux Users: You can
skip steps 18.1 to 18.5 —
your system natively supports SMB access with no extra
setup.
💡 We'll all meet back at Step 19.1!

Step 18.1: Go to the “Services” tab in the
OpenMediaVault sidebar.
🔹Breakdown:
-----In the left-hand navigation menu of OMV, scroll
down to find the “Services” section.
-----This is where all server features like SMB, FTP,
NFS, etc. are managed.
💡 We’ll be enabling SMB next to allow file sharing with
Windows devices! 📁🖥️
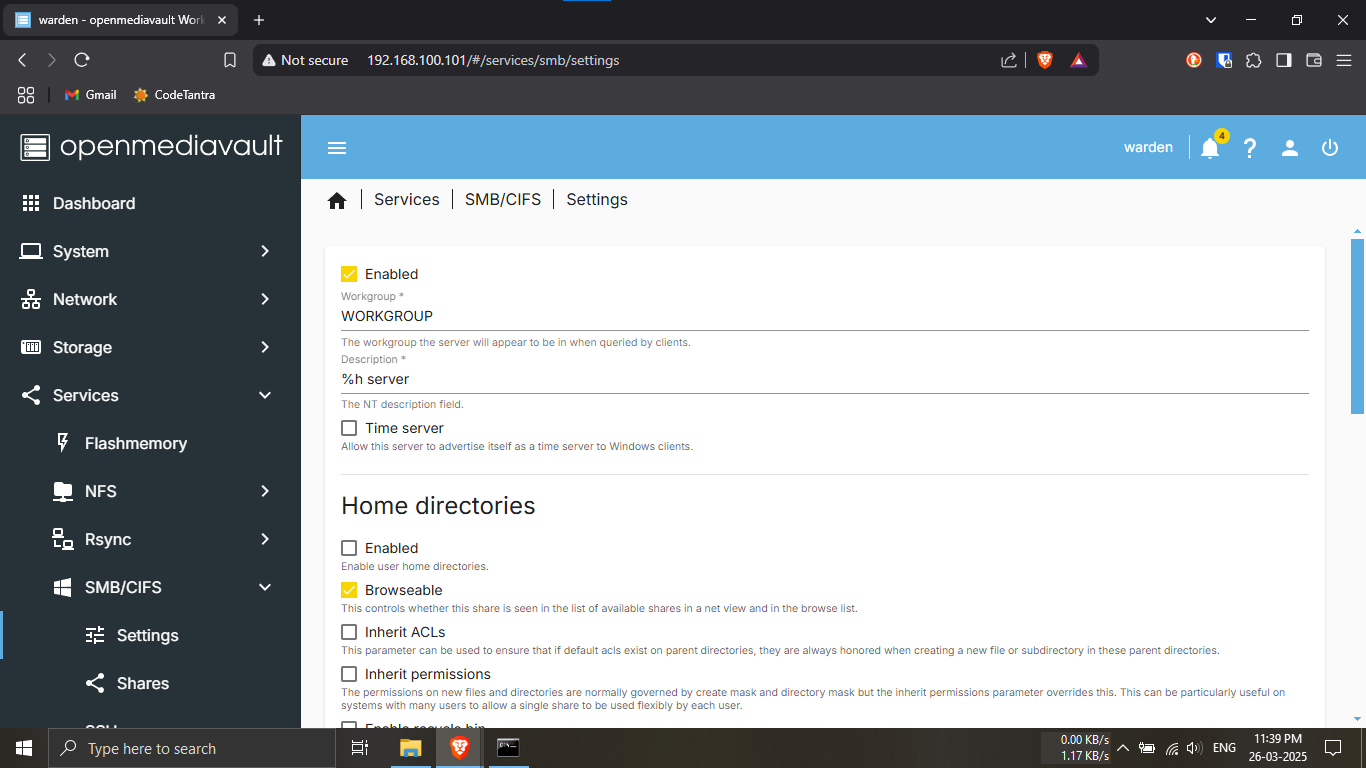
Step 18.2: Enable the SMB (CIFS) service to allow
Windows file sharing.
🔹Breakdown:
-----Under the Services tab, click on
CIFS / SMB — it has a Windows 10 icon next
to it.
-----Then, go to the “Settings” sub-tab within
CIFS/SMB.
-----At the top of the Settings page,
tick the “Enable” checkbox to turn on the
service.
-----Leave all other settings unchanged — the
defaults are fine.
💡 Enabling this allows your shared folders to be
accessed from Windows via the network! 🔄🖥️

Step 18.3: Navigate to the Shares section under
the SMB/CIFS menu.
🔹Breakdown:
-----Go back to the Services tab in the
sidebar.
-----Click on SMB/CIFS again to expand its
dropdown options.
-----Now select the “Shares” submenu.
💡 We've enabled the SMB service, but now we need to add
your shared folder (NAS) to it for access over your
local network! 🌐📂

Step 18.4: Configure the SMB Share using your NAS
folder.
🔹Breakdown:
-----Go to the “Shares” tab under
SMB/CIFS.
-----Click the “+ Add” button (if not already
opened).
-----Ensure the “Enable” checkbox is
ticked ✅.
-----In the “Shared Folder” dropdown menu, select
the folder we created earlier — e.g.,
NAS (see Step 17.9).
-----Scroll down and click on Save to apply the
settings.
💡 This step links your NAS folder to the SMB network
service, making it discoverable by Windows systems! 📁🌐
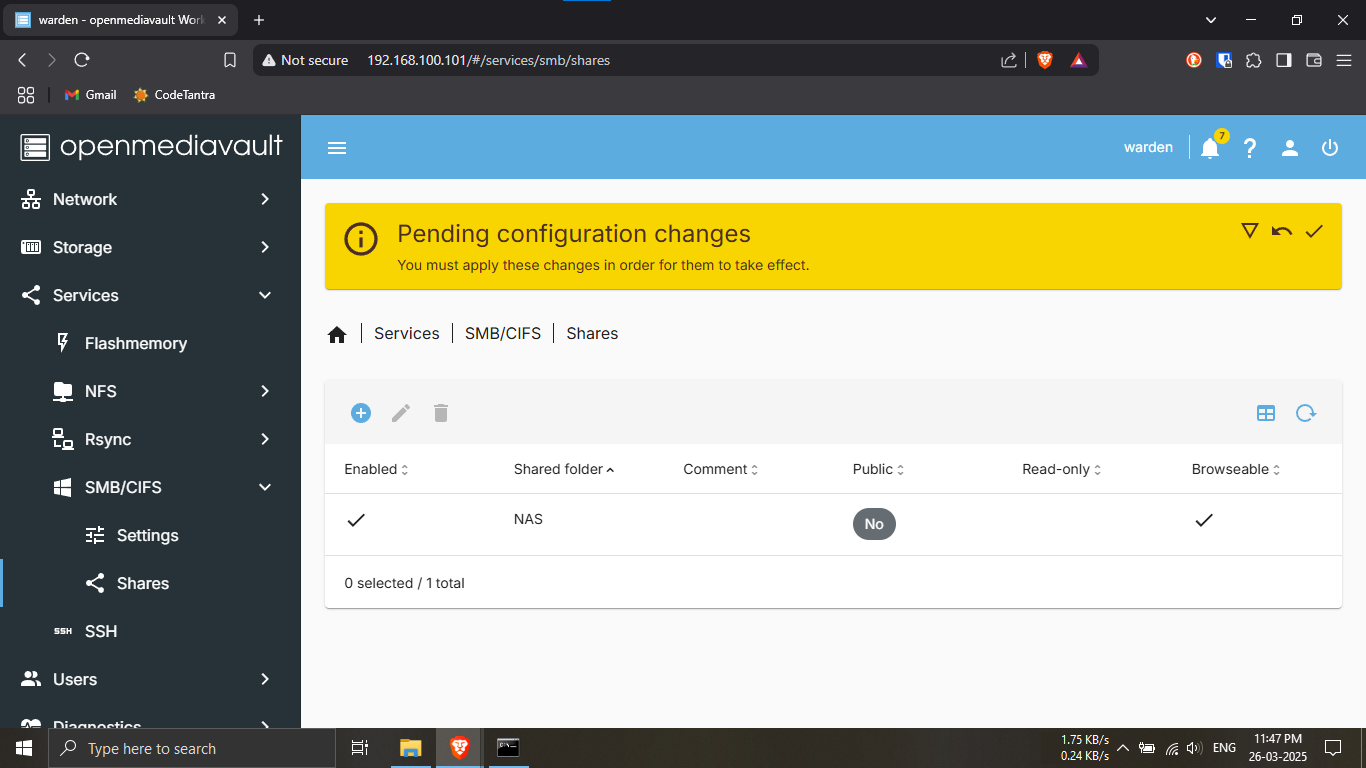
Step 18.5: Confirm your SMB share appears correctly —
setup complete for Windows users!
🔹Breakdown:
-----You should now see a shared folder listed under
SMB/CIFS → Shares.
-----It will show details like the name (e.g.,
NAS), the shared path, and enabled
status.
-----If everything looks good — your Windows
file-sharing setup is complete! 🎉
Note: The upcoming steps
(19.1 to 19.5) are specifically
for macOS and Linux users to access the NAS.
🍏🐧 macOS / Linux Users: Please proceed to Step 19.1
to configure SMB access.
🖥️ Windows Users: You can
skip these steps — you're
already set up from Step 18.1 to 18.5!
💡 Everyone will continue together from Step 20!

Step 19.1: Click on the “Services” tab and then
select “NFS”.
🔹Breakdown:
-----In the left-hand sidebar, go to
Services.
-----Click on the NFS tab — used for
Unix/macOS-based file sharing.
⚠️ Note: If you see a yellow border or
warning related to Windows services — don’t worry!
-----That’s just a leftover from the SMB/Windows setup.
It has no effect on your NFS config. 🎯
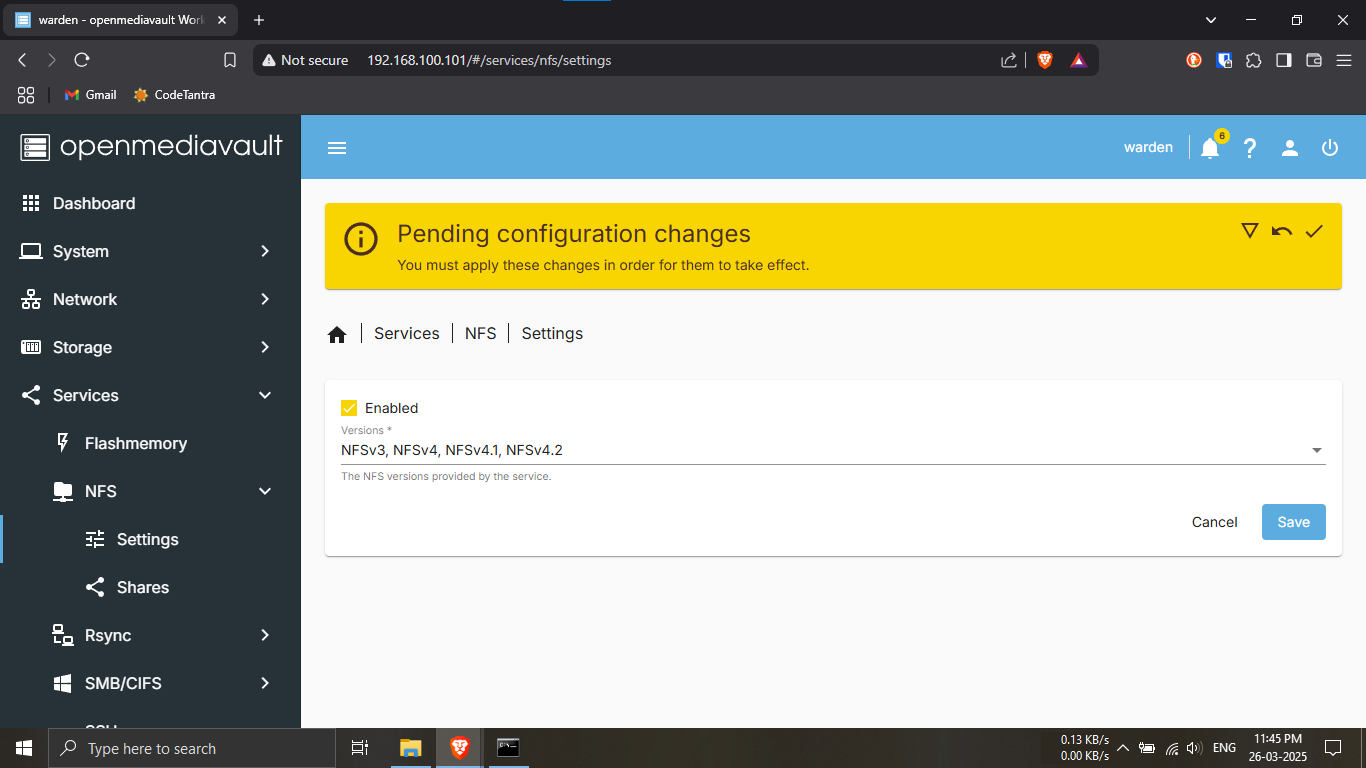
Step 19.2: Enable the NFS service.
🔹Breakdown:
-----While inside the NFS section, click on
“Settings”.
-----Tick the checkbox that says “Enable”.
-----Then click Save to apply the settings.
💡 This step activates NFS on your Raspberry Pi so
Linux/macOS machines can connect via the network.

Step 19.3: Click on “Shares” under the NFS
tab.
🔹Breakdown:
-----Go back to the NFS section.
-----Click on “Shares” — this is where NFS shares
are listed.
-----It will likely be empty right now — that's
expected.
💡 Don’t worry — we will now add the shared folder we
created earlier (NAS from Step 17.9).
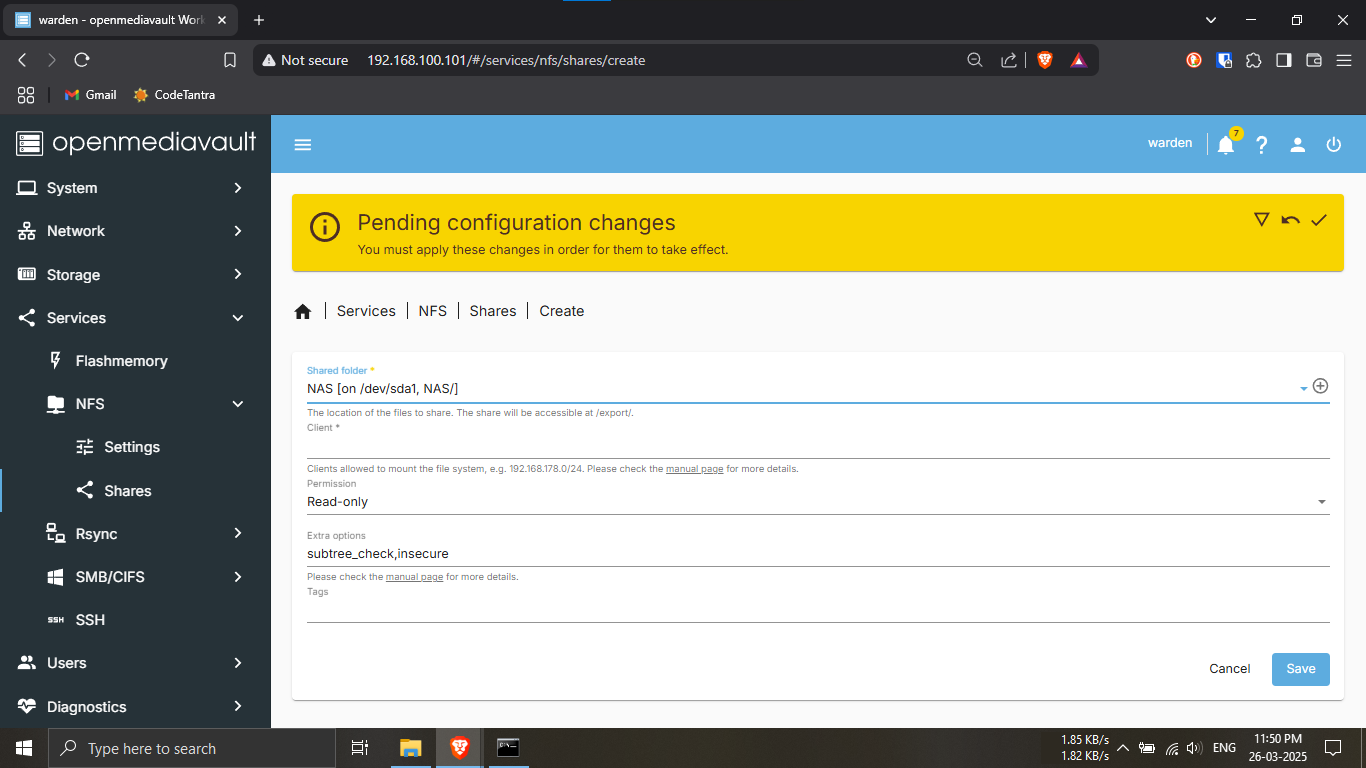
Step 19.4: Add your shared NAS folder to NFS.
🔹Breakdown:
-----Click the “+” button to add a new NFS
share.
-----In the Shared Folder dropdown, select
NAS (created earlier).
-----Leave all other options at their default
settings — don’t change anything.
-----Click Save to confirm.
💡 This allows macOS and Linux devices to mount the NAS
folder over the network!
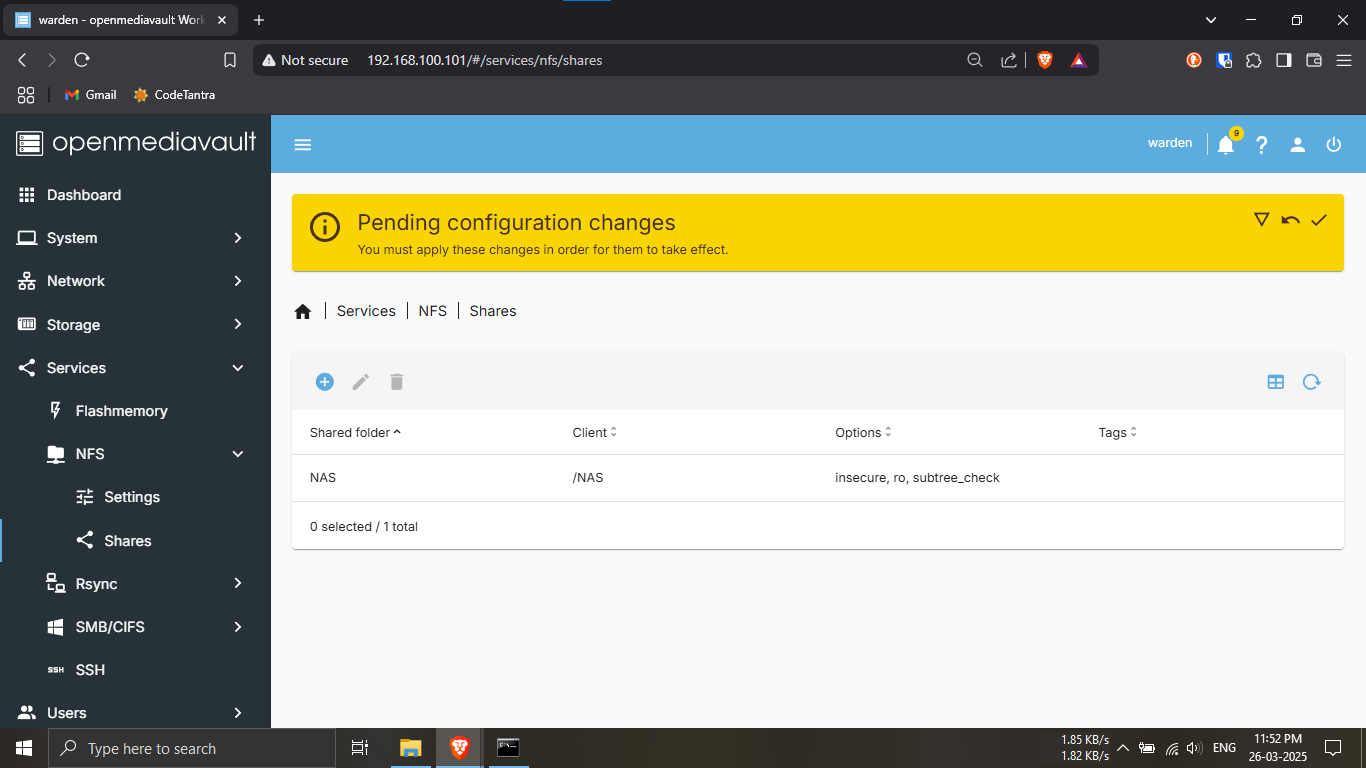
Step 19.5: You should now see your NAS NFS share
listed.
🔹Breakdown:
-----The new NAS share should be visible with its export
path, permissions, and default settings.
-----This confirms your NFS share is active and ready
for access from Linux/macOS devices! ✅
💡 You can now mount this NFS share using your system’s
native file sharing tools.
⚠️ Important Note:
Whether you're on
Windows or
macOS/Linux, we’ve made
several changes to the OpenMediaVault (OMV)
configuration.
📢 Please make sure to
click the yellow “Apply” button at the top of the OMV
dashboard before proceeding any further.
💡 This will confirm and apply all your pending changes such
as enabling SMB/NFS services and creating shared folders.
✅ Once done, you're ready to move ahead with the next
steps!
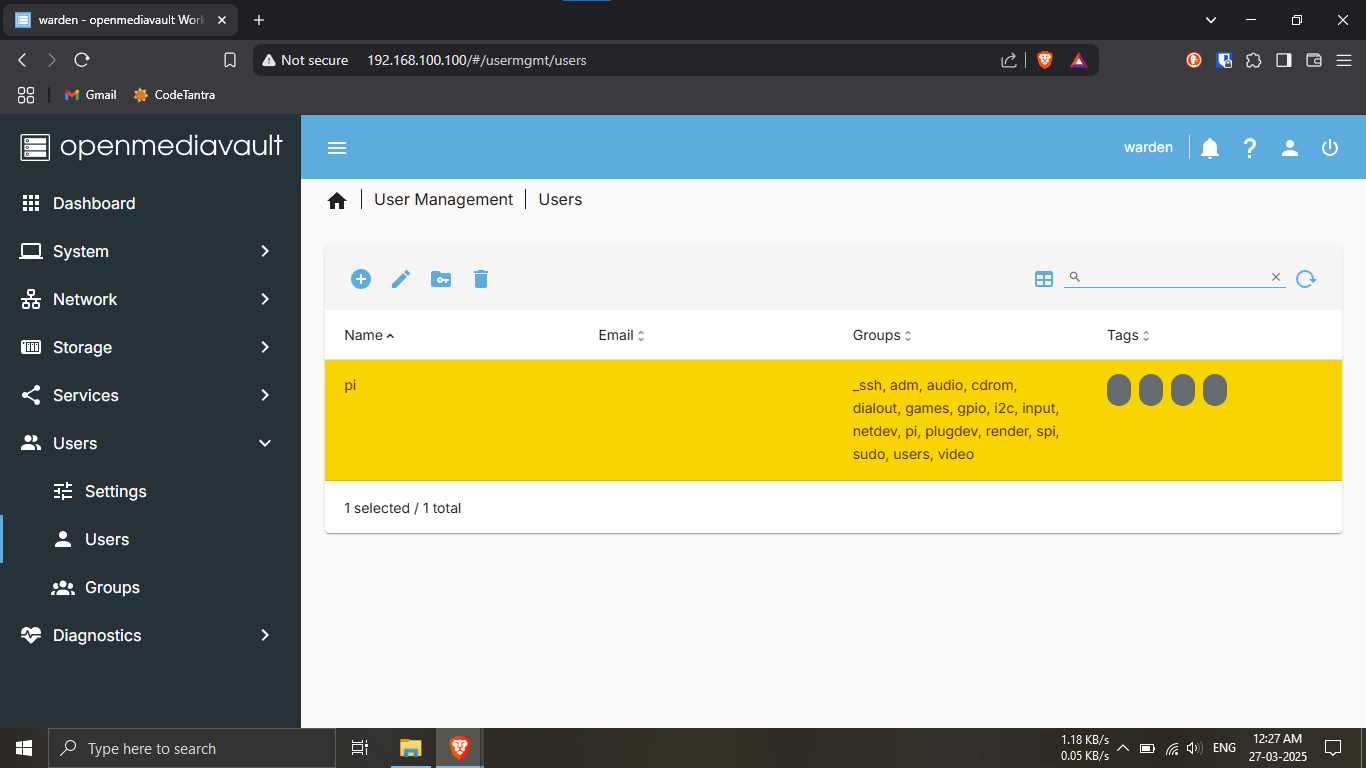
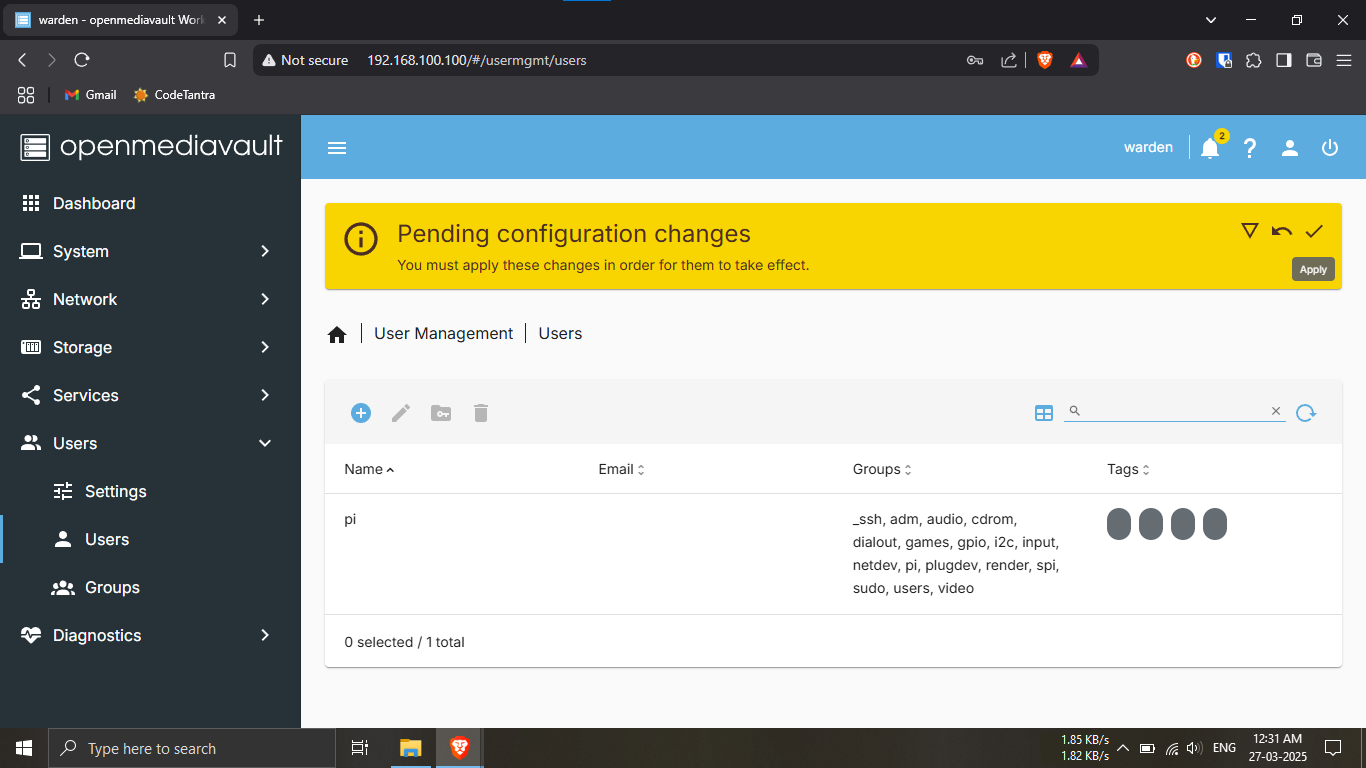
Step 21.1: Navigate to the Users tab and edit the
default user.
🔹Breakdown:
-----Click on the “Users” tab in the left sidebar
of the OMV interface.
-----Inside it, click again on the
“Users” menu.
-----You will see a single user listed — usually
pi if you're following this setup.
🔧 Action:
-----Select the user pi by clicking on their
row.
-----Click on the pencil icon (✏️) to open the
user configuration editor.
💡 By default, this user does not have a password set —
we will fix that in the next step.
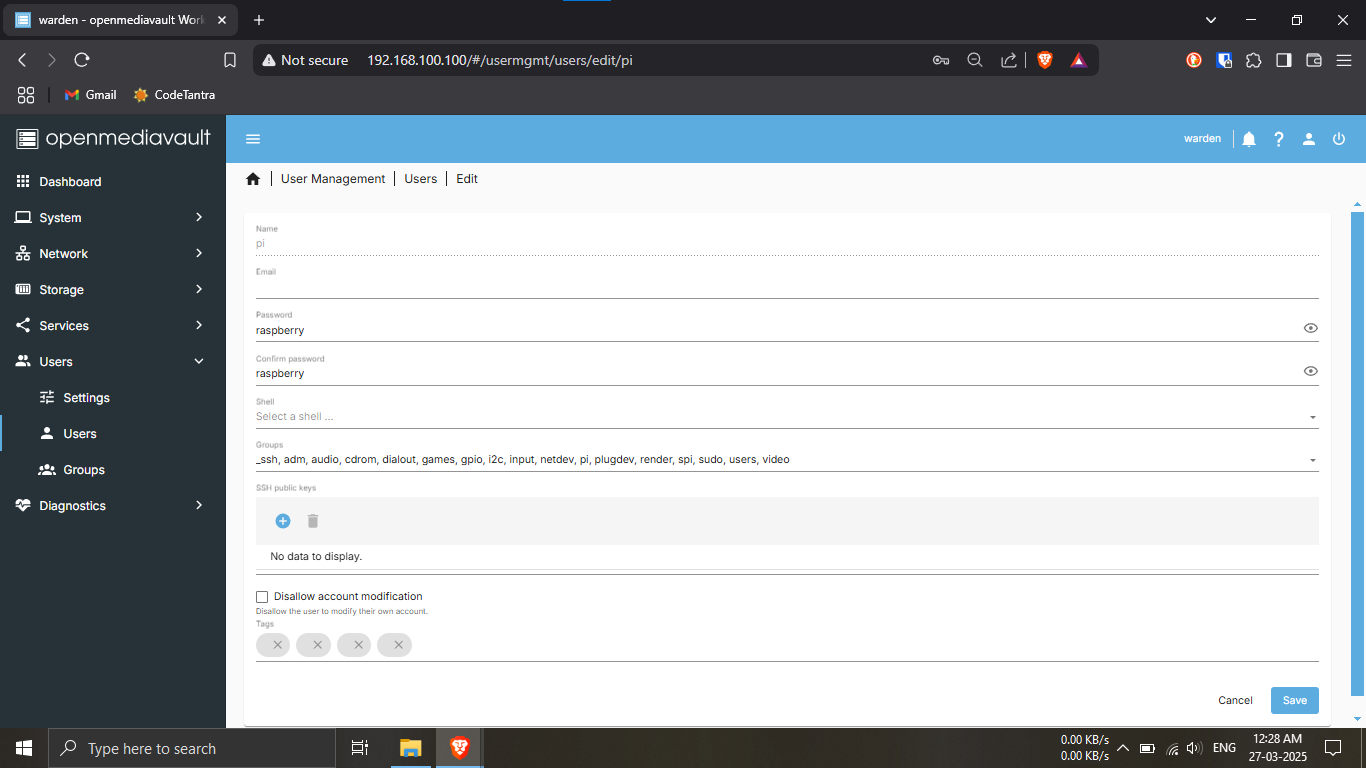
Step 21.2: Set a password for the pi user.
🔹Breakdown:
-----After clicking the pencil icon in the
previous step, you will be taken to the edit screen.
-----Find the Password and
Confirm Password fields.
-----Enter a strong, memorable password for the
pi user.
-----Click "Save"
💡 Important Note:
🔒 This password will act as a security credential when
you access your shared folders from your local PC.
📝 It's recommended to
note this password down somewhere safe for future
access.
Step 21.3: Apply the changes you've just made.
🔹Breakdown:
-----After setting the password for the user pi,
you’ll notice a yellow bar appear at the top of
the OMV dashboard.
-----This bar prompts you to apply the pending
changes.
🟡 Action:
-----Click on the "Apply" button in the yellow
bar.
-----Confirm when prompted.
💡 Skipping this will prevent the password and user
settings from being saved properly — make sure you apply
the changes before continuing!
PHASE_2_COMPLETE